Iperius Remote is the only remote support software that allows a full “re-branding”. That is the ability to be completely customized with the brand of your company.
The customization of Iperius Remote not only involves entering your company data into the software, but it also allows you to change the name of the software and its icon. This is really important for your corporate image when the remote assistance is a fundamental part of your business.
Finally, Iperius Remote allows you to preset several important options within the custom version to speed up and better manage remote desktop sessions.
Example: The possibility to generate a custom executable of Iperius Remote is included starting with the “Large” version. However, it is available with the smaller versions purchased separately for a one-time cost of 150 €.
Here are a few simple steps to generate and download a custom Iperius Remote executable:
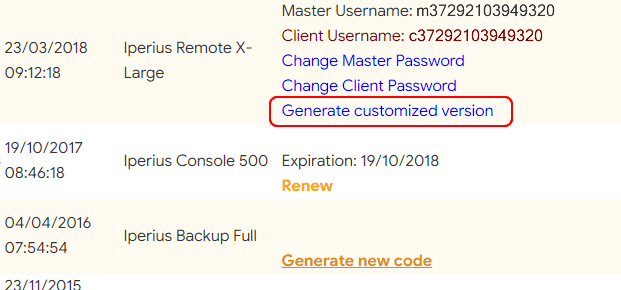
Once you have purchased a “Large” or higher version or a separate customization license, go to the license page and a link will be available on the license line of Iperius Remote, as shown in the image below:
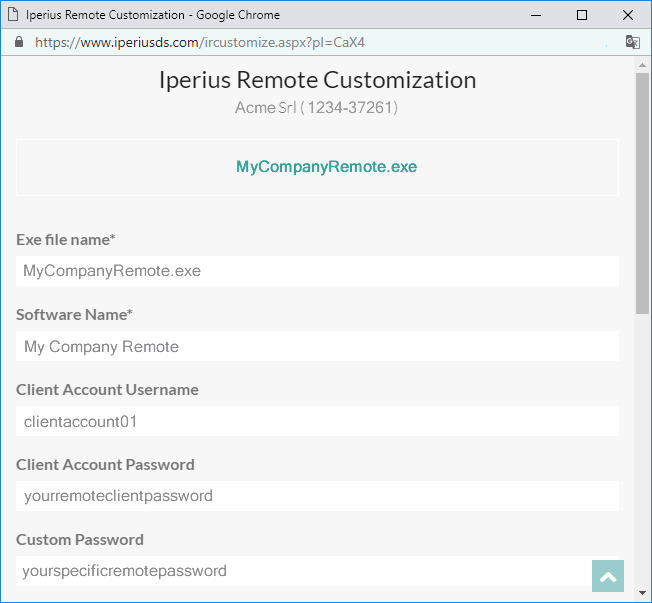
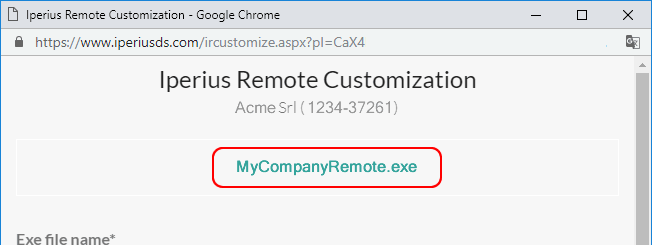
Clicking on the link will open a window where you can set all the custom data in a very simple way:
If you have previously generated a custom executable, you will find the link to download it at the top.
In any case, below are the various fields that you can fill out or modify. As you can see in the image, we can specify the executable file name and the software name (the one that will appear for example, in the title bar of the main window).
You can update the Client Account, which are the credentials that were created during the purchase phase and that are used to automatically authenticate the remote computers in our computer list. While we normally have to enter these credentials manually on the remote client, with the customization we can make sure that the custom executable automatically connects with these credentials. So as soon as a remote computer connects in receive mode, we can immediately see it in our contact list.
In the image below you can see where the Client Account will be automatically configured in the program:

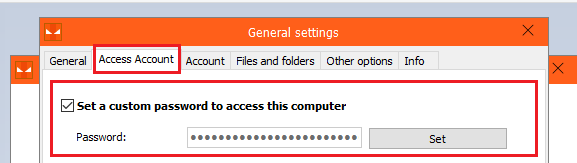
In the next field you can also set a specific password to connect remotely to the computers on which this custom version runs. If you have specified the Client Account credentials above, the password to access the remote computer will be the one of the Client Account. But if you specify the additional password, you can also use this one to connect remotely to computers. Having two passwords is certainly very useful when you want to allow access to other users, but you do not want to let them know the Client Account password. This password can be changed on the remote client afterwards.
In the image below you can see where the specific password in the program will be automatically configured:
Let’s move to the next few fields by scrolling the page:
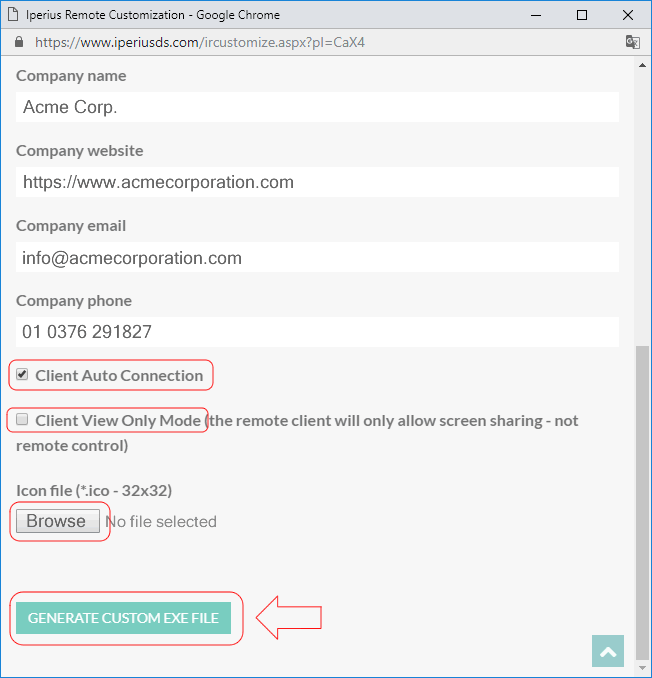
As you can see in the image above, the first four fields are related to company information, which will be shown in the information window of the custom executable (company name, website address, email and telephone number).
Immediately below, you have two important options. The first one is used to set the program to immediately connect itself in receive mode when it is opened (while normally it is necessary to click on “Allow connections”). This can speed up the start of the remote support session when the customer downloads and runs the software. In fact, once the custom version is opened, you can immediately see that remote client on your computer list, and connect automatically.
In the image below you can see how a remote client appears as soon as it connects in the computer list of an operator or of the administrator:
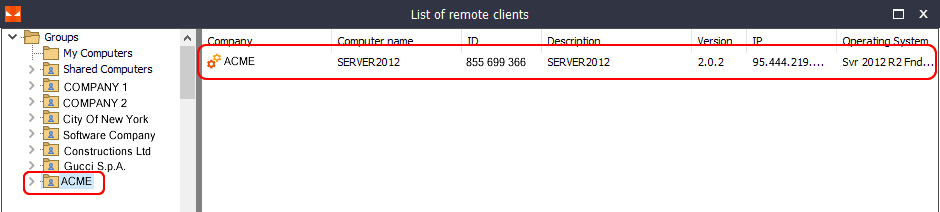
This list is available for administrators on the related Master Account and for operators who have entered their credentials in the program settings. This list will automatically show all the remote computers that, when they connect, have the Client Account set. Double clicking on the computer line will start the remote desktop session.
Returning to the custom executable file generation window, the other important option we talked about is the “view only mode” . If you check this option, remote clients that will connect will not have the option to interact in remote desktop with mouse and keyboard. So you can not take control of those machines but rather only view what is happening on the screen. This mode can be useful for a simple screen sharing or for presentations where you do not want those who connect to interact with the remote machine or make unwanted changes. When this mode is active, the file transfer feature will also be disabled.
Finally, the last option is to choose the program icon. This must be an .ICO file with at least a 32×32 pixel size (it is advisable to create an icon that has the dimensions 16, 32, 48 or 256).
Once you have set all of the options the way you want, you can click the button to generate the custom executable. The process will take several seconds and the following waiting message will be shown:

Once the executable file has been created, it will be possible to download it by clicking on the link at the top of the page:
You can then make this file available for download on company website, to provide your customers with a perfect remote support service.
My order no. 100023;
But now working my exe.
Hi
open a ticket on https://support.iperius.net
Hi,
open a ticket on https://support.iperius.net
Hello,
Is generated customized application signed by Iperius (has certificate) or not?
Hi,
yes, sure it’s signed by Iperius.
For more technical support, open a a ticket on https://support.iperius.net