In this article, we will go deeper into the difference between a Docker image and a container and create our Dockerfile to understand all the various phases of Docker container virtualization better.
We have already talked about this system in a tutorial where we learned how to install Docker.
But why talk about images and containers?
Docker image e container
To better clarify what the differences between images and containers are, try to think about an object-oriented language. In such an analogy, the class represents the image while its instance, the object, is the container.
The same image can create more containers.
Container virtualization is therefore fundamentally based on images, the files available on the Docker Hub and used to create and initialize an application in a new Docker container.
Each image is defined by a Dockerfile, a configuration file containing all the commands that a user needs to execute to model the image.
The Dockerfile layers
The dockerfile is a powerful tool for defining images thanks to its layered structure, which contains commands, libraries to be used and dependencies.
Some layers may be in more projects, so this feature guarantees the reuse of what already downloaded and consequently an ensure on the performances and, not less important, a saving of time and physical space.
Let us assume, for example, that we need to use images of two RDBMS such as PostgreSQL and MySQL (or MariaDB).
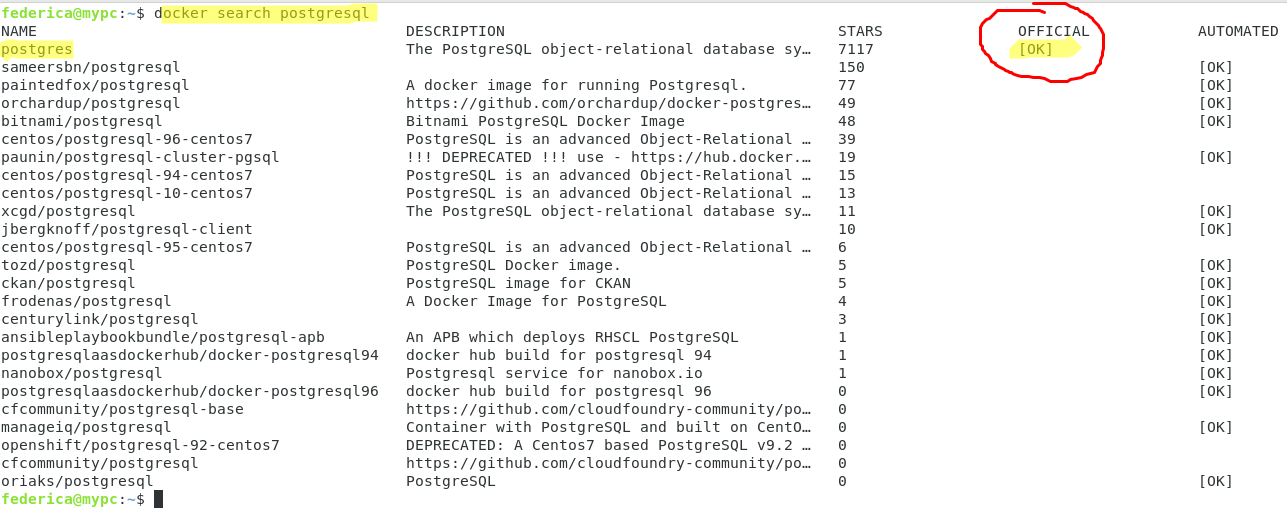
First, we start searching, with the command docker search, for the official images contained on the dockerhub for these two systems and then we take the official images.
#docker search postgresql
#docker search mysql

In this second case, we can choose either MySQL or MariaDB.
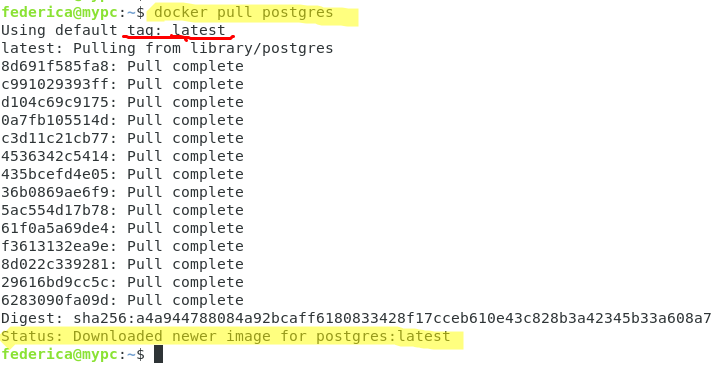
We choose the latter, and with the command docker pull we download the images locally from the DockerHub.
# docker pull postgres
#docker pull mariadb
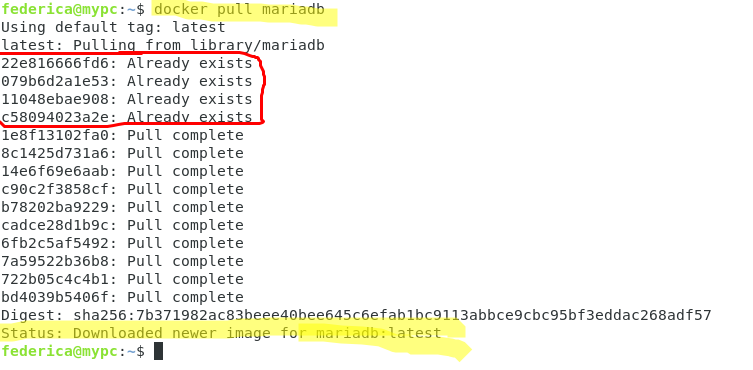
We can observe that the final status indicates the correct download of the images (latest version – identified by the default tag) and that in both cases they are composed of 14 distinct layers.
We note, however, that in the case of MariaDB, the first four layers are indicated with “Already exists”. In fact, they had already been downloaded in a previous pull, and therefore, it is not necessary to re-download them.
An identifier distinguishes each of these layers while the penultimate string “Digest” univocally represents the image just downloaded as a hash of the image itself.
To better understand this aspect of Docker layers, let’s explore how to build a DockerFile.
Costruiamo un DockerFile
If needed, it’s possible to create your own Dockerfiles, adding levels to a base image – one that represents the base from which to start – or from an empty image in case of need to have ultimate freedom in management.
In both cases, the first line will contain the FROM command, which will indicate the base image (scratch in the case of an empty image).
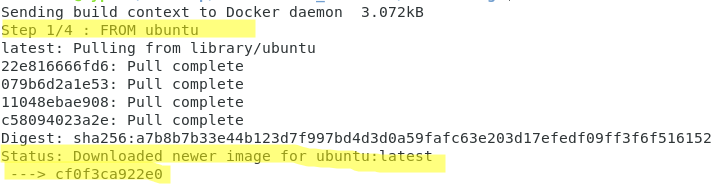
Let’s take the example of a simple Dockerfile derived from an official ubuntu image.
We create our Dockerfile with the preferred editor and add the following lines:
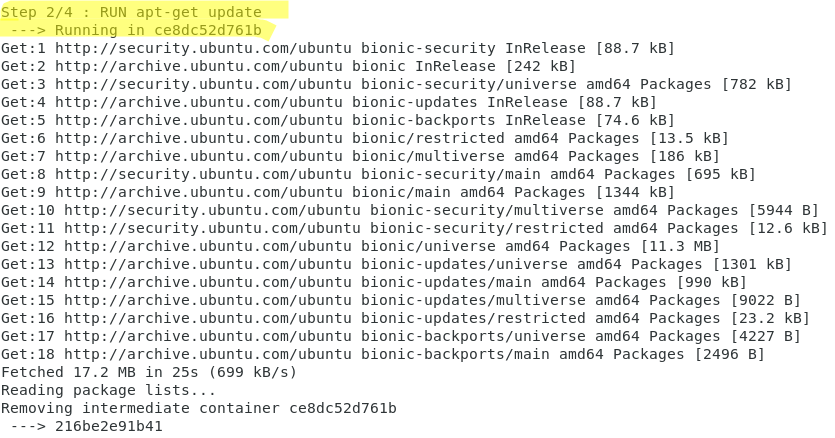
FROM ubuntu
RUN apt-get update
RUN apt-get install --yes apache2
COPY index.html /var/www/html/index.html
At the first level (FROM ubuntu), we add three levels that represent the commands we want to add.
We execute the build command to build the image as described on the file in the following way:
#docker build.
Don’t forget the dot (.) that indicates the current directory where docker searches for a dockerfile, exactly with this name.
As you can see from the images below, the build operation consists of 4 steps, which correspond to the four layers of our image.


Actually, intermediate levels will be built, which have cache function in following executions, as can be seen from the command:
#docker images -a

The images identified with <none> in the repository column are the intermediate ones.
To understand better, let’s try to re-execute the command now
#docker build .
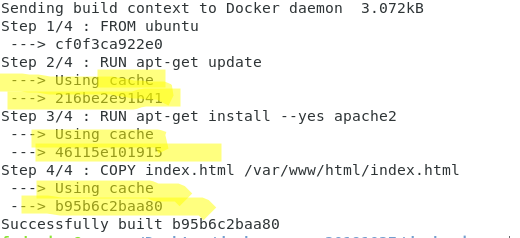
It is easy to test that now the image build is much faster and reuses images that are already cached.
Image 46115e101915, for example, is the one that is reused in step 3/4.
Containers
Up to now, we’ve talked about how to download an image or to build and implement your own.
But it is with the “docker run” command that everything really takes shape.
#docker run --rm --name ubuntu_apache -it ubuntu
![]()
In fact, this command allows you to instantiate a container on the newly created image.
The options chosen in this case are those referring to interactivity (-i), to the allocation of a TTY console (-t) and to the possibility of directly removing the container after exiting (–rm).
The official Docker documentation contains the list of all the options for the run command.
While the image consists of a series of layers all in read-only mode, the container adds a top layer (also called container layer) in read-write mode.
And every time a new container is instantiated on the same image, a new layer is added to create new containers.
If we want to have a list of active and non-active containers, we can execute the command
#docker ps -a

Using containers is useful because you can easily and quickly build a development or test environment as often as you want.
Exiting the console with the exit command, the container, thanks to the –rm option, will no longer exist.
Now let’s try using the command:
#docker run --name ubuntu_apache -it ubuntu
without the previous removal option.

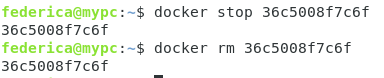
At this point, if we wanted to remove it manually, we would have to use the
#docker rm
command followed by the id.
But not before stopping it.
So the correct sequence of the commands is the following:
If instead, we wanted to restart the previously stopped container, the command to use is
#docker start
and in our example case it would be:
![]()
Conclusions
In this article, we have been able to understand, from some examples, how it is easy to implement perfectly functional environments, replicable on any machine by using the layer-system scalability of the docker images.
Later, we will talk about how to increase the potential of this tool with powerful mechanisms such as Docker-compose and Docker-swarm.
Credits images:
metal PNG Designed By Mark1987 from Pngtree.com
Docker Icon made by Freepik from www.flaticon.com
PLEASE NOTE: if you need technical support or have any sales or technical question, don't use comments. Instead open a TICKET here: https://www.iperiusbackup.com/contact.aspx
**********************************************************************************
PLEASE NOTE: if you need technical support or have any sales or technical question, don't use comments. Instead open a TICKET here: https://www.iperiusbackup.com/contact.aspx
*****************************************