Starting from version 6.0, Iperius offers the possibility to create a recovery drive (USB or an ISO file to burn) with the Iperius Recovery Environment® boot system, which allows you to boot a machine and restore a drive image backup created by Iperius (.VHD or .VHDX files).
This provides the ability to perform a bare-metal restore, a true disaster recovery even on different hardware, and to do this, no Windows installation disk is required, but simply the Iperius recovery disc. To see how to create a recovery drive, refer to the relevant tutorial.
See also: Drive image backup, disk cloning and P2V with Iperius
Once we have created the recovery drive, insert it into the machine to be booted, or the one where we want to restore the backup. Optionally select in the BIOS to boot the machine from the inserted drive. At this point, the machine will start with the Iperius Recovery Environment®, whose interface is shown in the window below.

Now let’s look at the various steps to perform the backup image restore.
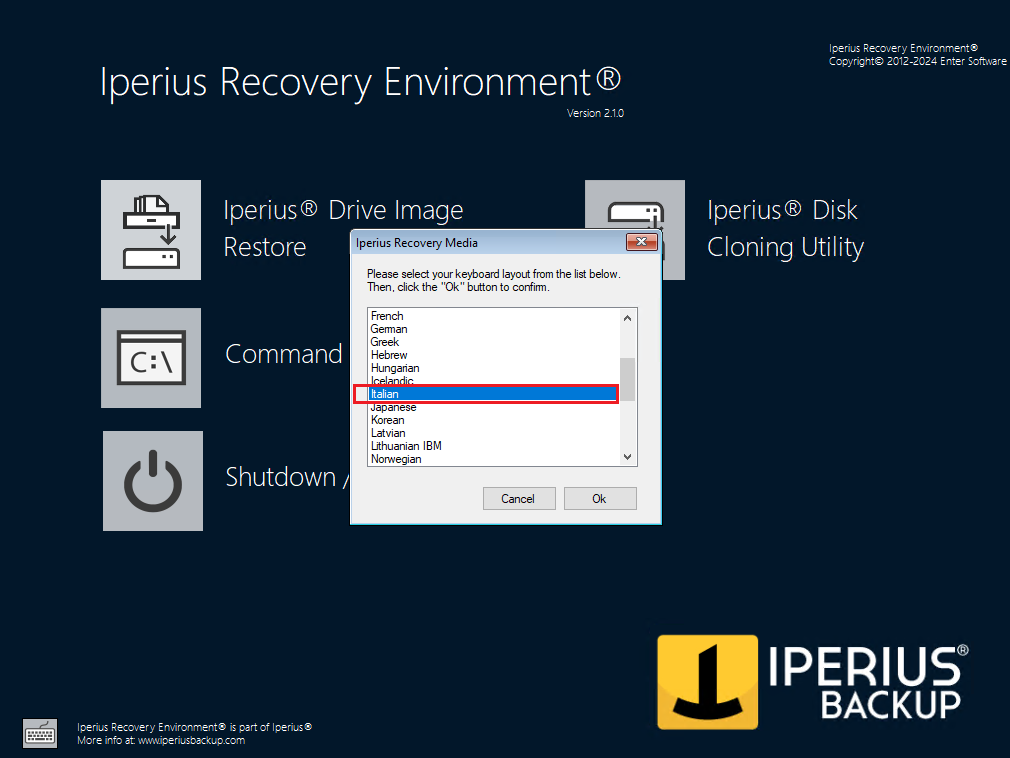
NB: A preliminary operation to perform before starting the Iperius Backup recovery interface is to select our current keyboard layout, to avoid the connected keyboard being incorrectly mapped within the software.
To do this, simply click on the keyboard icon at the bottom left and select your keyboard layout (the default is set to US: American), clicking the OK button to confirm (see the image below).
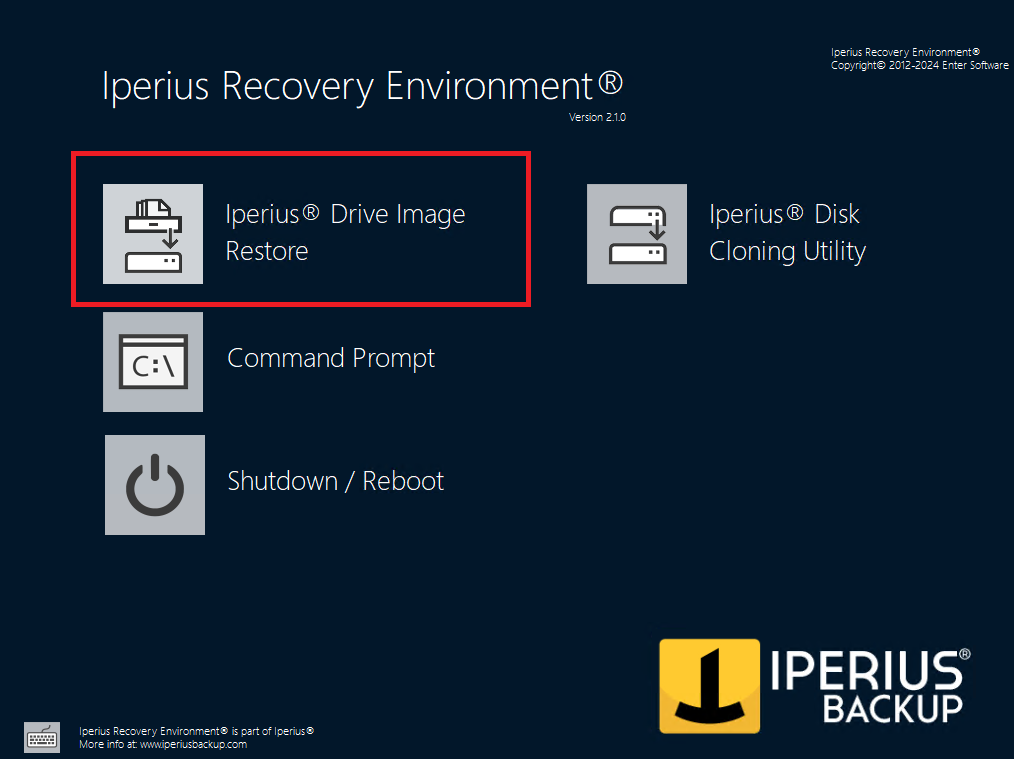
After correctly setting the keyboard layout, we can start the recovery program by clicking on the Iperius Recovery Environment icon (as shown in the image below):
Now let’s go step by step through the process for restoring an Iperius Drive Image backup.
1) Selecting the Drive Image backup path
After starting the interface, we need to select the path of our backup, which will consist of one or more .vhdx or .vhd files (i.e., virtual hard disks) and a .idi or .idicbt file (Iperius Drive Image, the configuration file needed to restore full or incremental backups).
First, we need to select the type of path where the image is located, choosing between the two options available (see the image below):
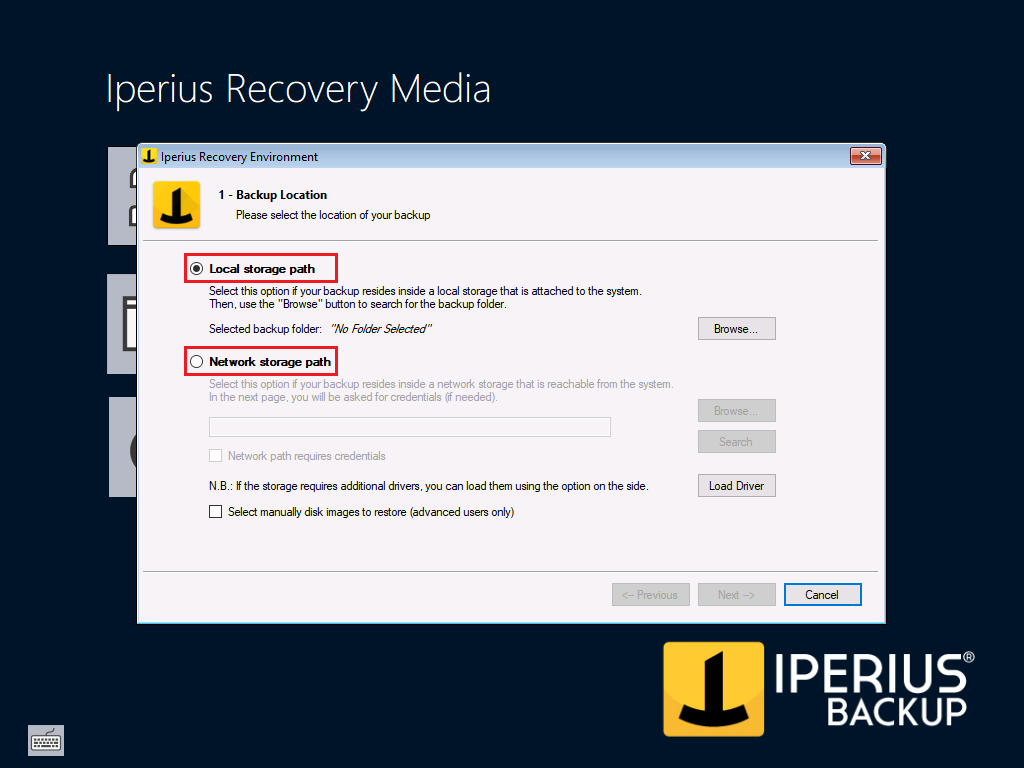
1a) Local Storage Path: corresponds to a local path on the machine (hard drive, USB stick, or any device mapped as a drive letter);
2b) Network Storage Path: corresponds to a network path accessible from the machine (NAS, shared folder, etc.);
1a) Selecting a local path
Let’s start with the local path.
To select it, after correctly checking the “Local Storage Path” option, simply click on the “Browse” button and use the folder tree to find and select the .idi or .idicbt file present in the folder where your backup to be restored is located (see the next screenshot).
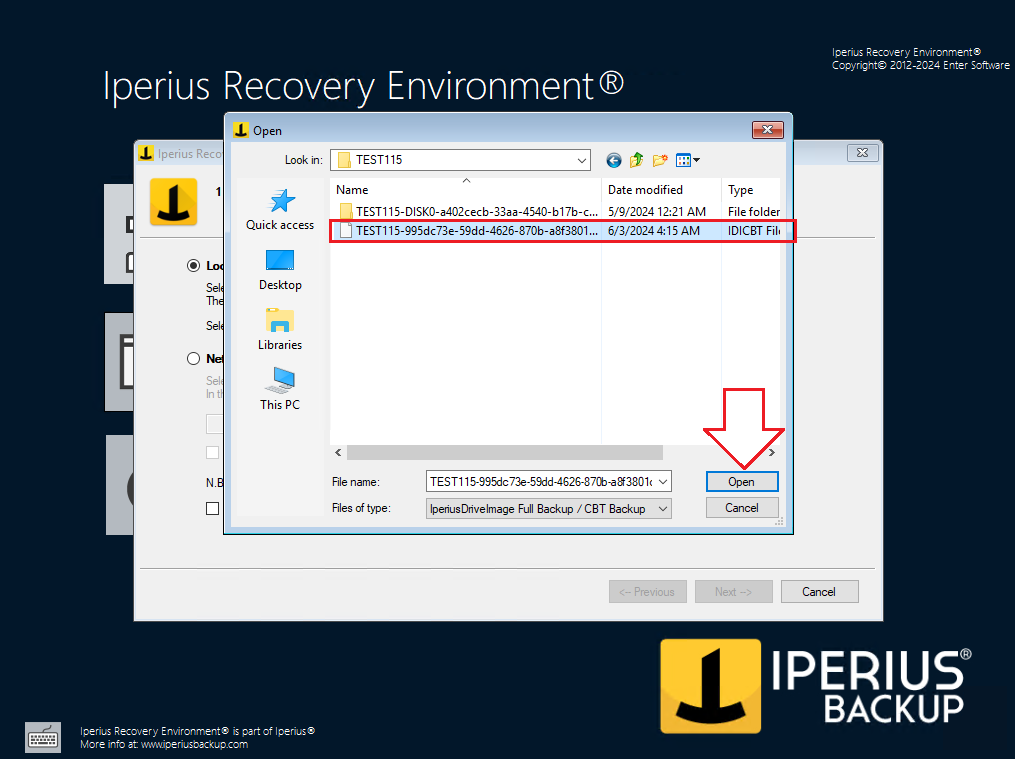
To confirm, simply click the OK button highlighted above in the figure.
The path will be immediately scanned, providing the user with a positive message if one or more backups are found (see the image below, right side) or a warning message if no backup is found (see the image below, left side).
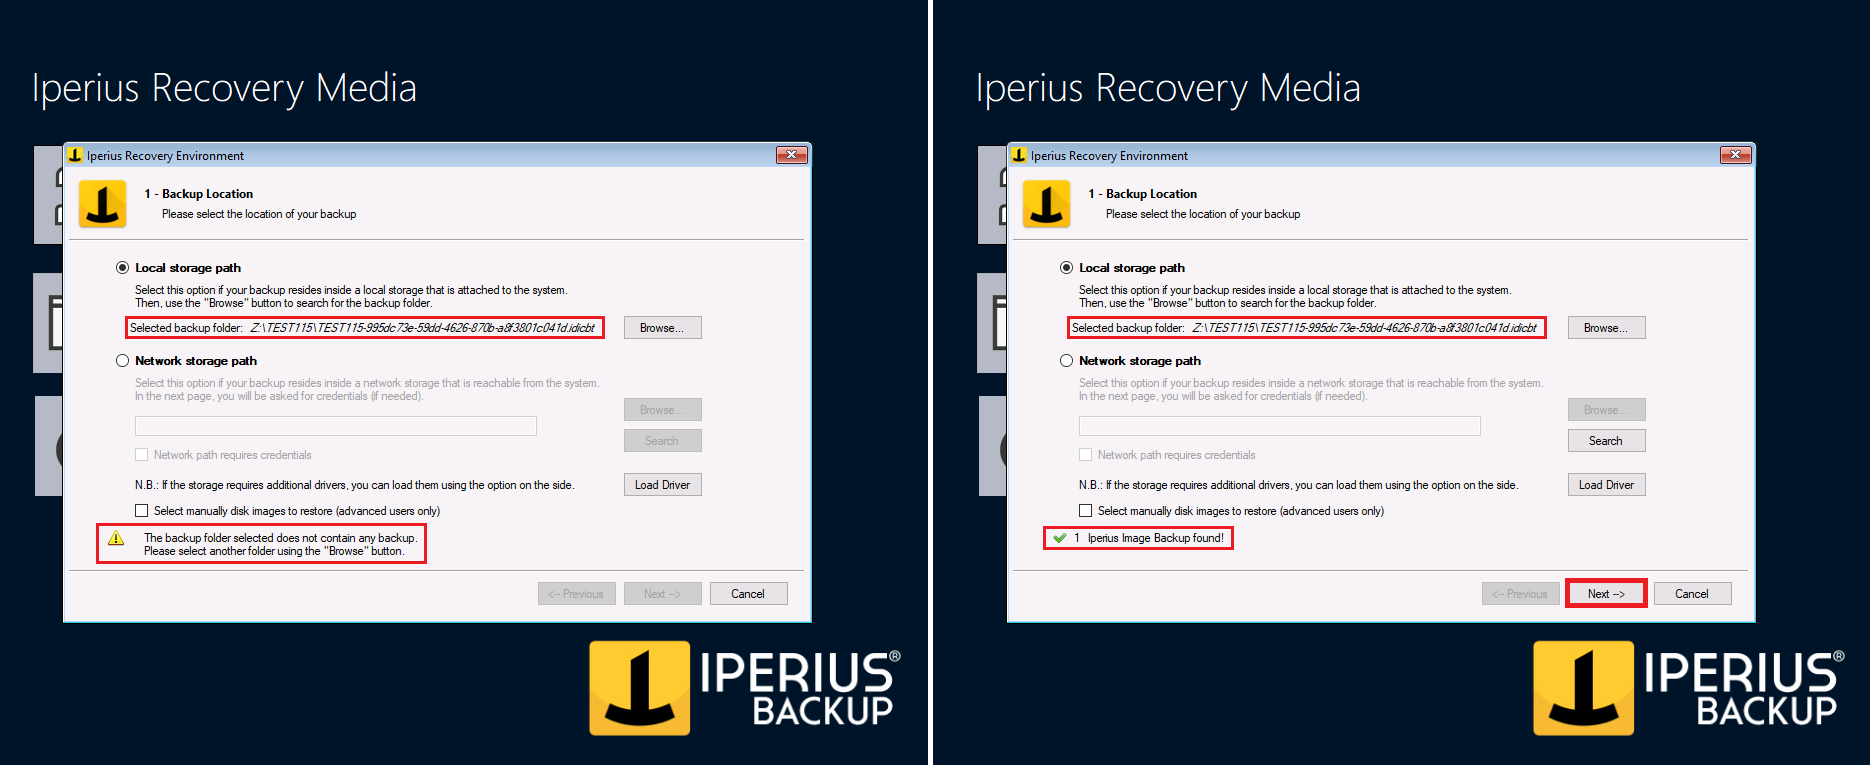
In the first case, if one or more backups are found, we can proceed to the next step by clicking the “Next” button.
1b) Selecting a network path
Now let’s look at the case where our image to be restored is located on a network path accessible from the machine where we have started Iperius Recovery Environment.
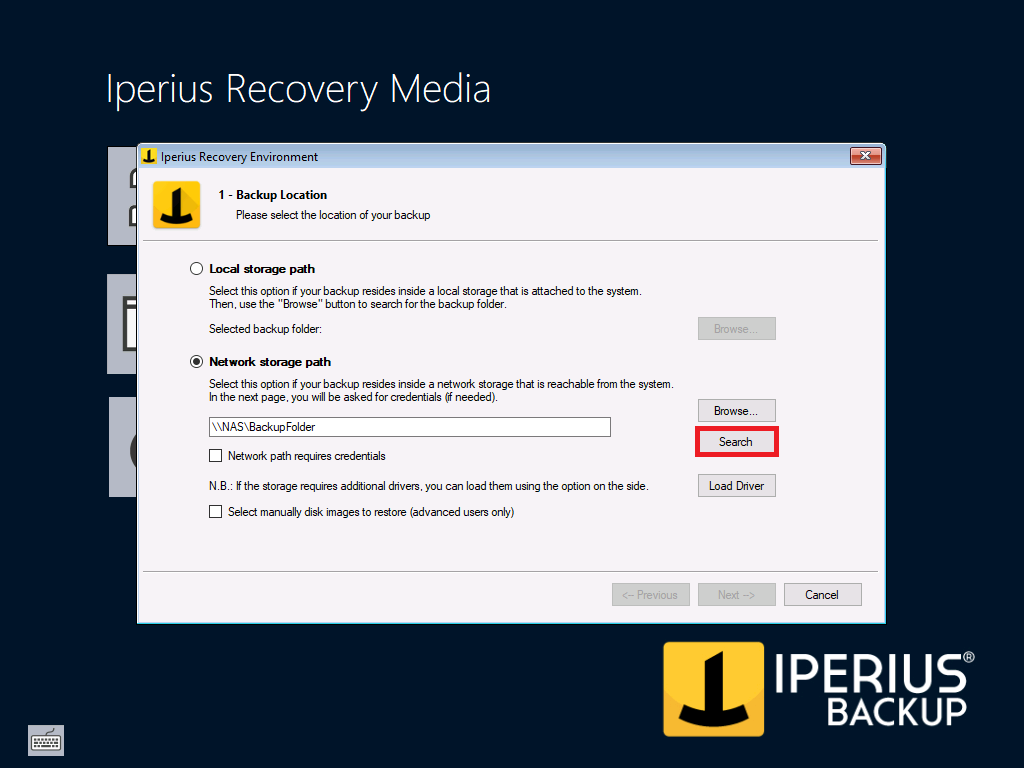
First, check the “Network Storage Path” option and enter the path of the folder where the .idi file of our backup to be restored is located in the box below (we can also use the “Browse” button to view the devices detected on the network).
Finally, click the “Search” button to start scanning the path (see the image below):
Again, at the end of the scan, a positive message will be provided to the user if one or more backups are found or a warning message if no backup is found.
Only in the first case, however, will the “Next” button be enabled, allowing us to proceed to the next step.
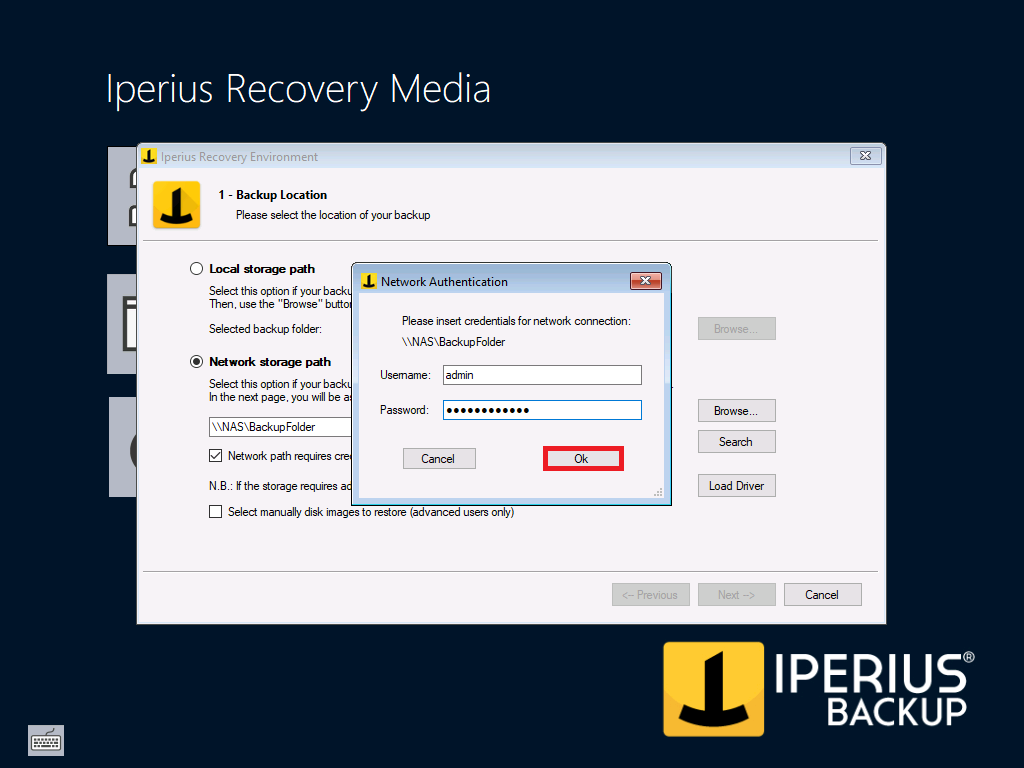
Setting network access credentials: If the network path we enter is protected by credentials, it will be necessary to check the “Network path requires credentials” box before proceeding with the scan.
By doing so, after clicking the “Search” button, an additional window will open where you can enter the network credentials for the path (see the image below), which you will simply need to confirm by clicking the OK button.
After entering a local or network path containing at least one backup to be restored, click the “Next” button to proceed to the next step.
2) Selecting the backup to restore
At this point, one or more backups detected within the selected path will be displayed in the window (see the image below).
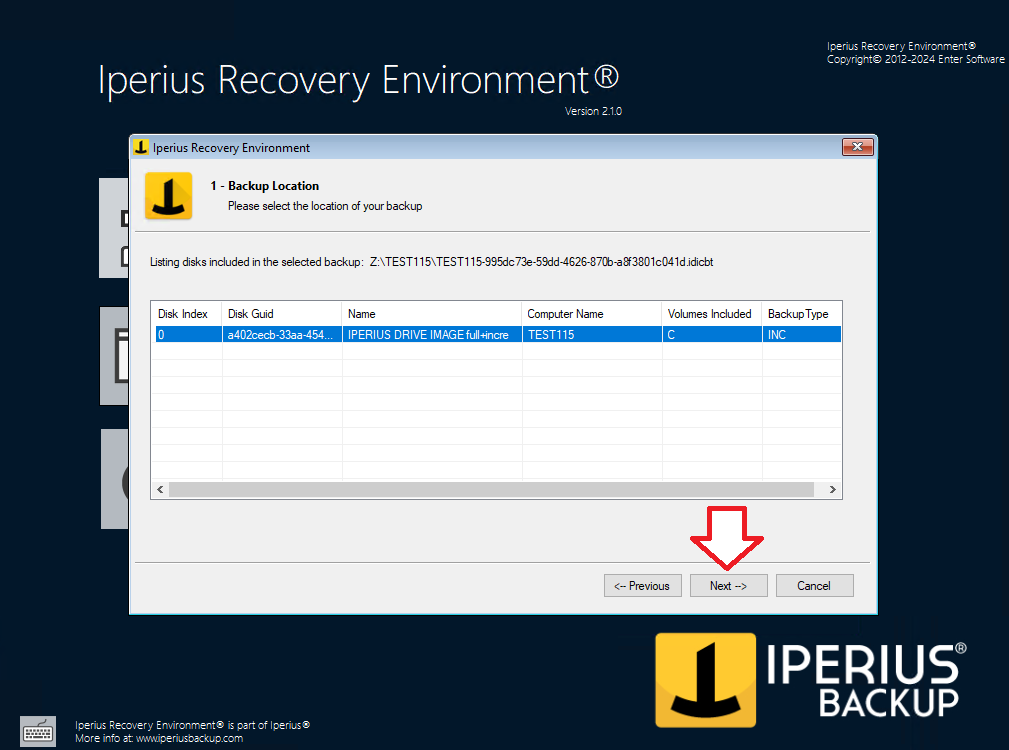
Each row corresponds to a backup, each including the main information (backup job name, computer name, included volumes, and backup type).
To proceed, simply select one of the backups and click the “Next” button.
If the type of backup to be restored is Full or Patching, continue to paragraph 3.
If the type of backup to be restored is an incremental or differential backup, there is an additional step, which is to choose the incremental/differential to restore.

Each row corresponds to an incremental/differential backup, and each lists the backup job name, date, computer name, included volumes, and the number of disks saved.
For example, we choose to select the third row, so in our case, Iperius will have to restore the Full backup and the following 2 incrementals.
Let’s move forward by clicking the “Next” button.
3) Selecting the restore mapping
In the restore mapping selection window (see the image below), we need to assign a hard disk to each .vhdx or .vhd file (i.e., the disks included in the backup) that we intend to restore.
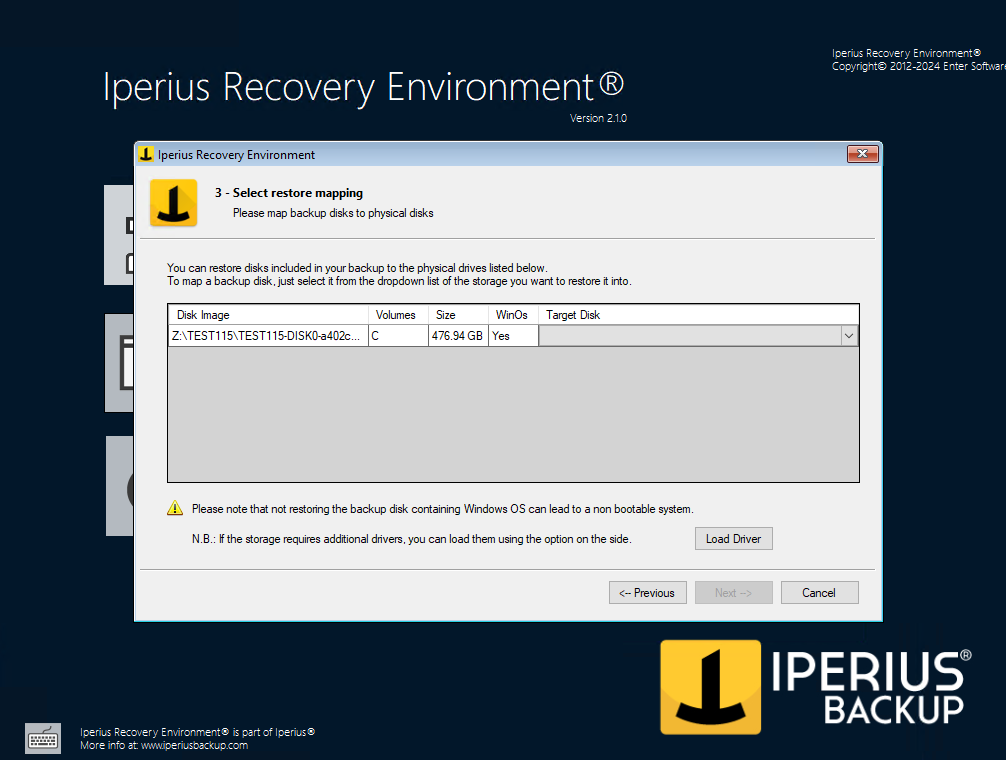
For each disk included in the backup, the path of the corresponding .vhdx (or .vhd) file, the included volumes, the size, and whether the disk contains a Windows installation will be displayed.
At this point, we need to assign a hard disk to the .vhdx file displayed in the figure.
To do this, simply click on the drop-down menu of the “Target Disk” box (see the figure below) to view a list of hard disks connected to the system and choose the one where the respective .vhdx (or .vhd) file will be restored.
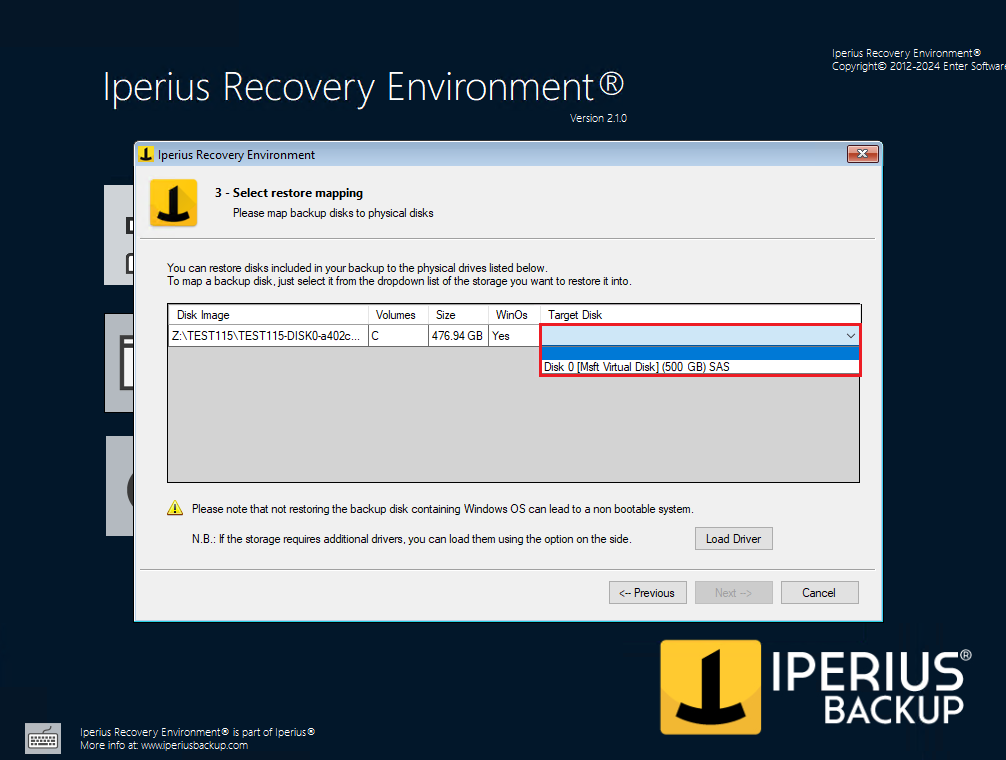
In the list, the disks connected to the system are listed in the following format:
Disk N [Disk_Name] (100 GB) Disk_Type
where:
– N corresponds to the disk number;
– in square brackets is the name (label);
– in parentheses is the size;
– at the end is the disk type (USB, SAS, SCSI, etc.)
NB: The selected hard disk must be equal to or larger than the disk to be restored (described in the “Size” field). NB2: If the hard disk you want to select is a RAID or a device that requires a specific driver, you can load it using the “Load Driver” button and selecting the .inf file of the respective driver.
Once the disk mappings for the restore have been established, simply click the “Next” button to proceed to the next window.
4) Confirming the restore settings
This screen consists of a brief summary of the restore mapping performed in the previous window (see the image below).
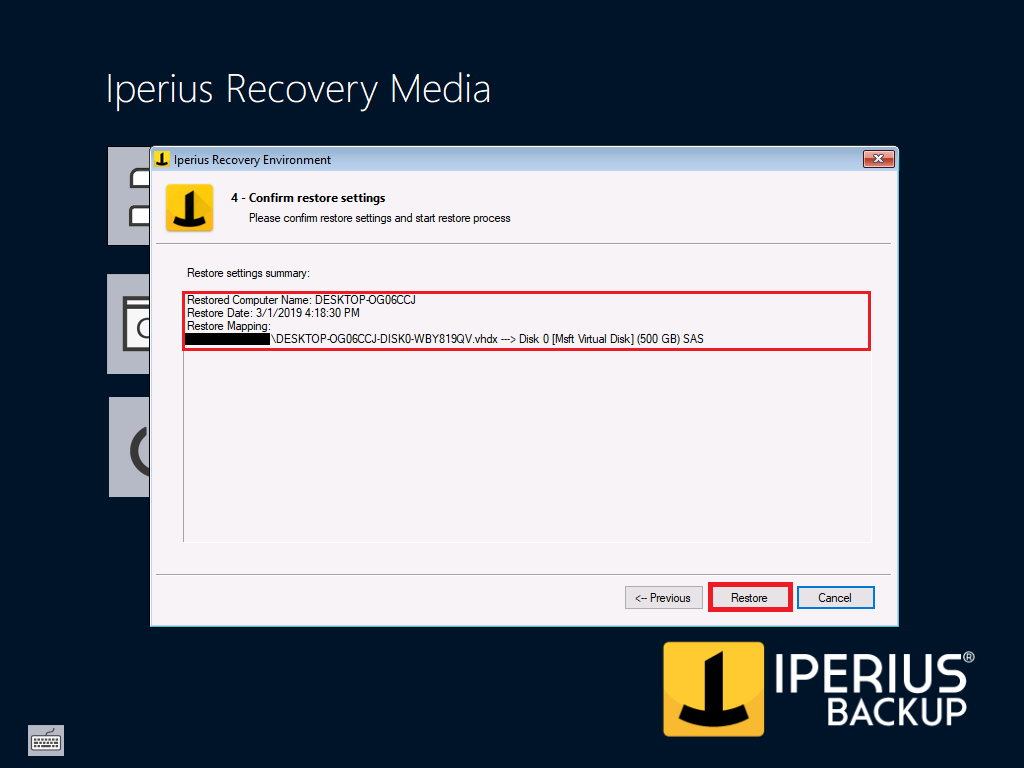
If everything is set as desired, simply click the “Restore” button to start the restore process or the “Previous” button to go back to the previous window and correct the configuration.
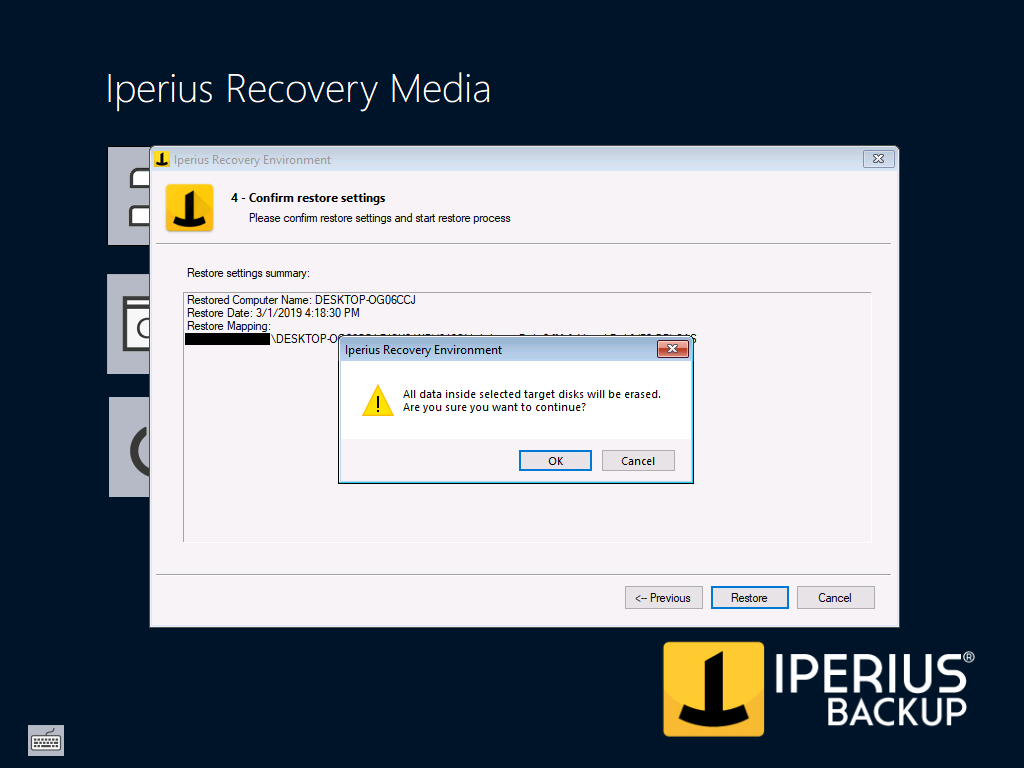
Clicking the “Restore” button will open a warning window informing you that by proceeding, all data on the selected hard disks will be erased: by pressing “OK,” the restore process will begin, while clicking “Cancel” will return you to the summary window (see the screenshot below).
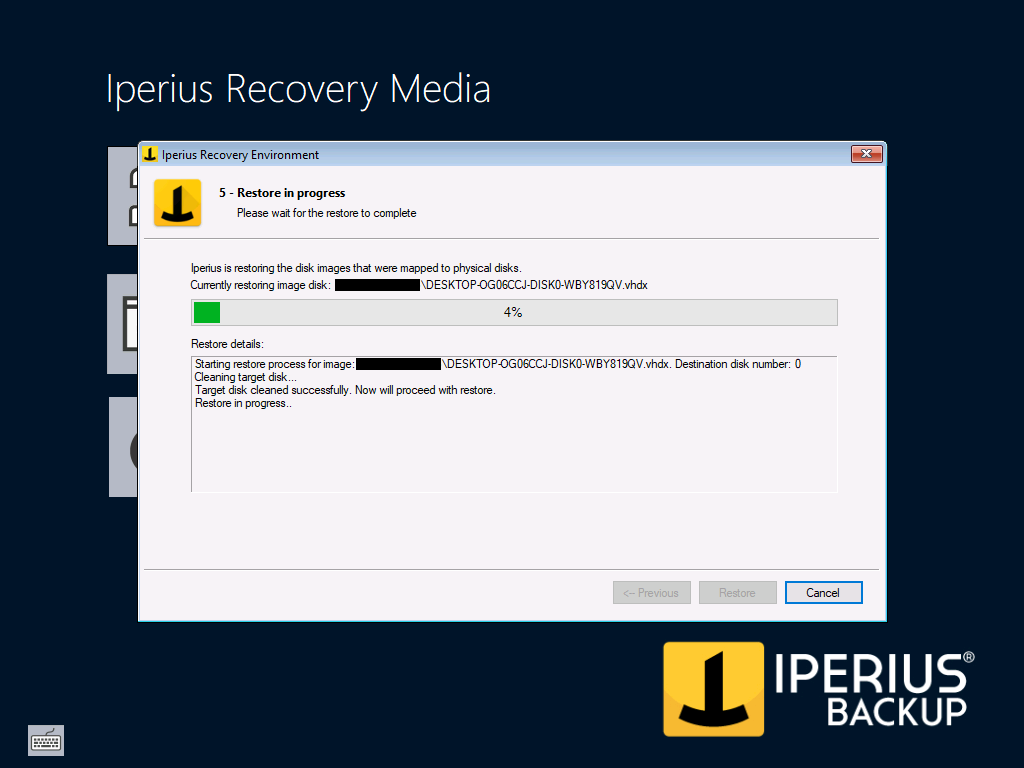
5) Starting the restore
After clicking the OK button in the previous window, the restore procedure will start, first cleaning the disk and then writing the image file to the hard disk (see the next image).
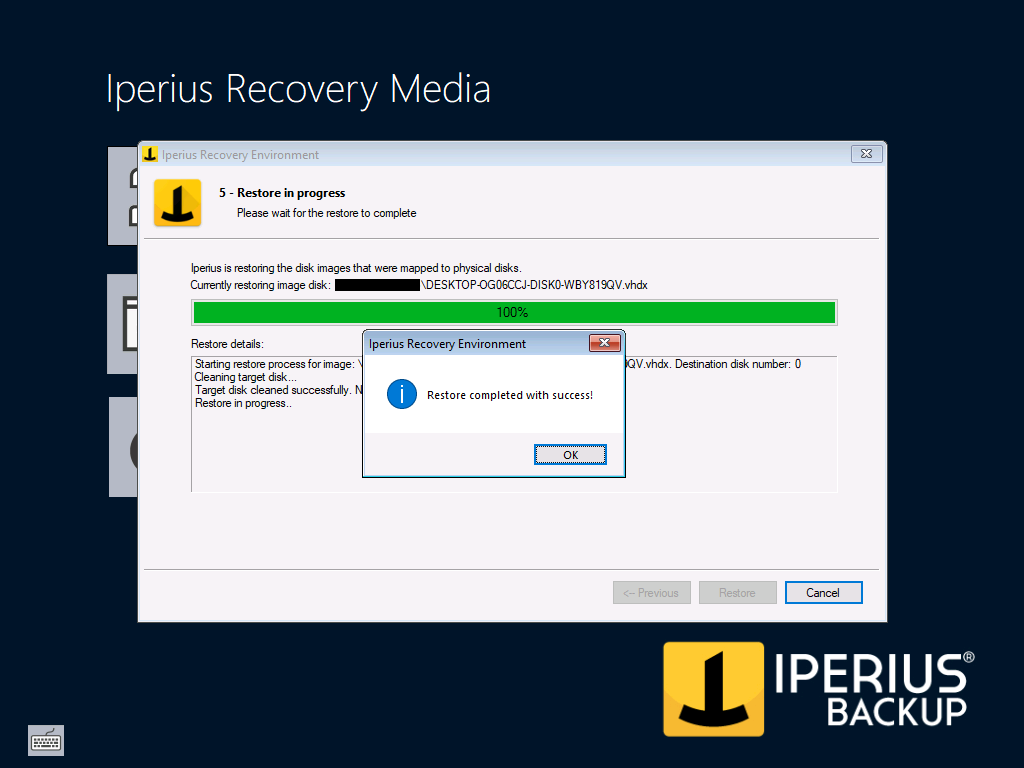
Once the restore is complete, simply click the “OK” button and then the “Finish” button to exit the procedure (as shown in the figure below).
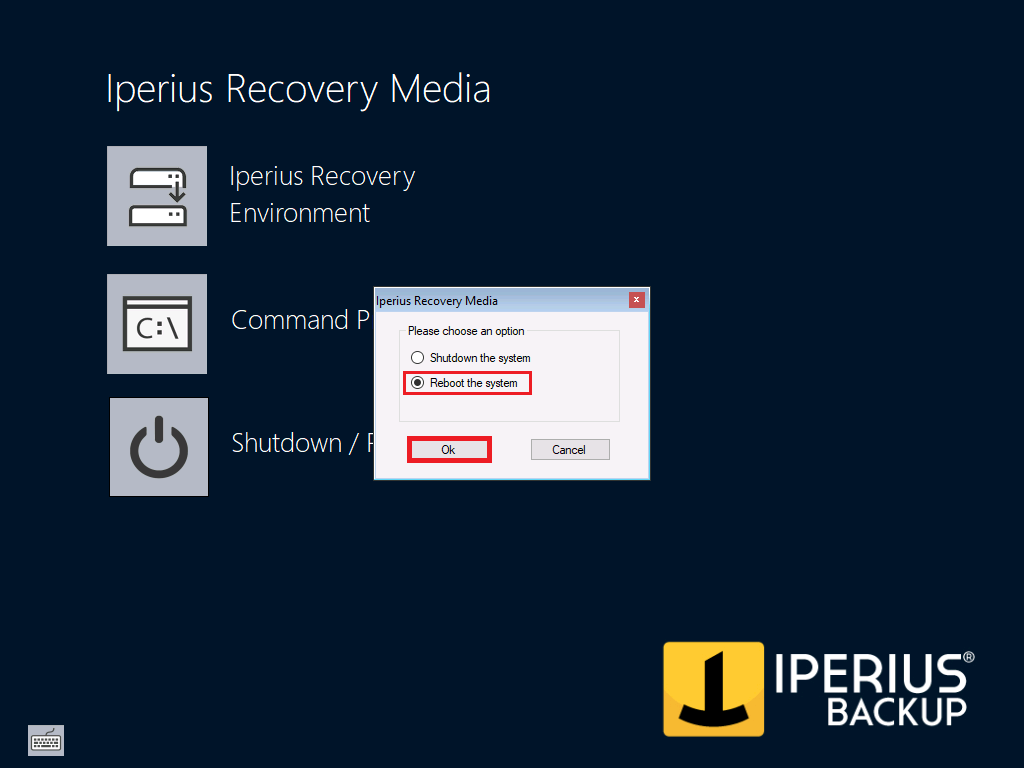
6) Restarting the system
In the main window of the Iperius Recovery Environment, click on the “Shutdown/Reboot” icon and check the “Reboot” option.
At this point, remove the device from which Iperius Recovery Environment was started (USB stick or CD-ROM) and click the OK button to confirm (see the image below).
The machine will restart, and the operating system will start from the point where it was at the time of the backup.
NB: In case of restore on different hardware, for older systems (Windows 7 and Server 2008), it is recommended to start the system in safe mode, install the main drivers of the new hardware, and restart the system normally, to avoid compatibility issues.
Hello .i have windows image backup from iperius .i need to restore different hardware.im create usb recovery media.when im choose destination folder could nof find legal file.how i could to restore another computer?
Hi,
If you used inside Iperius Backup the function “Windows Drive Image” you have to follow this tutorial for the restore: https://www.iperiusbackup.net/en/restore-computer-from-system-image-backup/.
Otherwise, if you still have issue, open a ticket on https://support.iperius.net
hi im crate system image .when im restore different hardvare im colud not find .idi file.where locate this .idi file?
Hi,
If you used inside Iperius Backup the function “Windows Drive Image” you have to follow this tutorial for the restore: https://www.iperiusbackup.net/en/restore-computer-from-system-image-backup/.
Otherwise, if you used “Iperius Drive Image”, open a ticket on https://support.iperius.net
Hi, is it possible to create a full backup of my Virtual Private Server in the cloud and restore it to another Virtual Private Server (at another VPS provider)?
The problem is that I cannot use an external recovery disk/windows setup disk to boot from in the cloud!
Thanks,
Danny
Hi,
Unfortunately with Iperius Backup is not possible to copy the image directly to Cloud, is necessary an intermediate step and save the image in a local/remote path.
Then, for the restore procedure, you need first to download the image from the Cloud and then follow the recovery steps you find in the tutorials.
For more technical support, please open a ticket on https://support.iperius.net.
encountered an error
error during restore process.
Please contact iperius backup support.
but as per checking the restored image was successful.
Hi,
We will continue the conversation by ticket.
Hi, I’ve made yesterday an image backup of OS drive (a SSD) before some updates.
The files vhdx and idi were created with no problem.
I’ve had to do a restore and founf this in log:
03-06-2020 4:37:36 Disk brought offline successfully.
03-06-2020 5:02:10 Message: A device attached to the system is not functioning
03-06-2020 5:02:10 Error: 31
03-06-2020 5:02:10 There were errors during the restore process.
There was only one external drive attached to the desktop and not related to the backup operation.
Oddly (and hopefully) the system has bootep up (apparently) with no problem.
Hello, did you also try to attach the VHDX file using the built in Windows function, in the Disk Management Console? Anyway, I’m sure the backup is perfectly ok, but, to better solve this issue in browsing the image file, plase open a ticket in our support portal: https://support.iperius.net
Hi, I plan to make a full backup image of a laptop. The laptop’s operating system/programs and data span two physical drives. Is it possible to create one image backup file and restore it to two physical drives? Can the volumes be restored individually?
Hi,
It depends on the technology you used to create the spanned volume. If it’s made with Windows Dynamic disk, you can just backup each volume to a .vhdx file. Instead, you will be able to backup the whole disk and, if loading the raid driver inside the recovery environment, also restore it to the same raid array that forms the spanned disk.
for more technical support open a ticket on https://support.iperius.net
If the network I’m on doesn’t use DHCP, how can I set the static network parameters so that Iperius can restore from a network connection. Currently when I bootup with the restore environment the network is undefined. Does the restore environment only work for DHCP networks or can I specifically add I IP address ?
hi
for technical support, please open a ticket from https://www.iperiusbackup.com/contact.aspx