Disk2vhd is a free software to convert a disk into a corresponding .VHD / .VHDX image file. It can be used to make an image backup of a system, or to virtualize it on a Hyper-V environment.
Virtualization is one of the key aspects of any modern and efficient IT infrastructure. Disk2vhd can therefore be a quick solution to convert physical machines into virtual ones, and have them immediately available in Hyper-V. Disk2vhd was initially created by the SysInternals company, later acquired by Microsoft.
See also: Hard Drive Cloning: How to use Iperius to clone your hard disk
Below we review the simple steps to convert a physical machine to VHD:
1. Download the Disk2vhd utility
Go to Sysinternals page of Microsoft website and download Disj2vhd.
2. Extract the program from the zip and run it
Dik2vhd is portable (no installation required), so just run it. The following interface will be shown, with the list of disks on your computerr:
There are very few options to set:
Use VHDX: VHDX is a new disc format introduced with Windows Server 2012. Compared to the VHD, the VHDX has several improvements, including an internal organization created to reduce data corruption and increased capacity (up to 64 TB). VHDX is the recommended choice.
Use VSS: this option is essential to perform the hot creation of the image and to obtain a consistent copy of the data
VHD File name: Select the destination where the software will create the VHDX file (choose a different disk than the one you are making the image of, or a network path).
Select the disks you want to convert to VHDX. Clearly, if you are doing this to virtualize an operating system, you will have to select the disk where Windows is installed so that it can then start up as a virtual machine.
Click on Create to start the process.
Disk2vhd will make a shadow copy (VSS) of the selected disks and create the respective VHDX image files. Let’s see how to use a Windows image file to boot the system on a Hyper-V virtual machine:
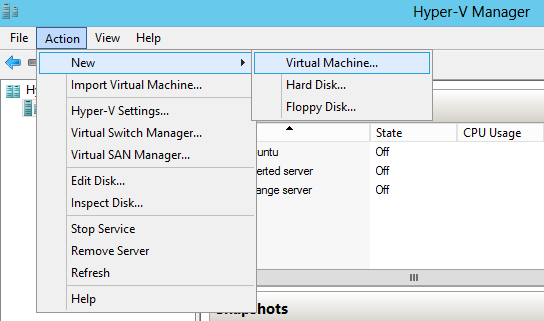
3: Create a new virtual machine on a Hyper-V host
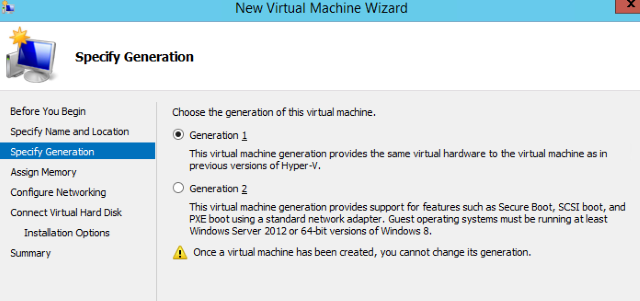
After copying the VHDX file to a Hyper-V server, you can use it as a boot disk of a virtual machine. You must first create a VM using Hyper-V Manager. Run the wizard New – »Virtual Machine in Hyper-V Manager and configure the various parameters (CPU, memory, etc.) according to your needs. On Server 2012 R2 it will also be necessary to specify the VM generation.
4. Connect the VHDX file as a virtual machine disk:
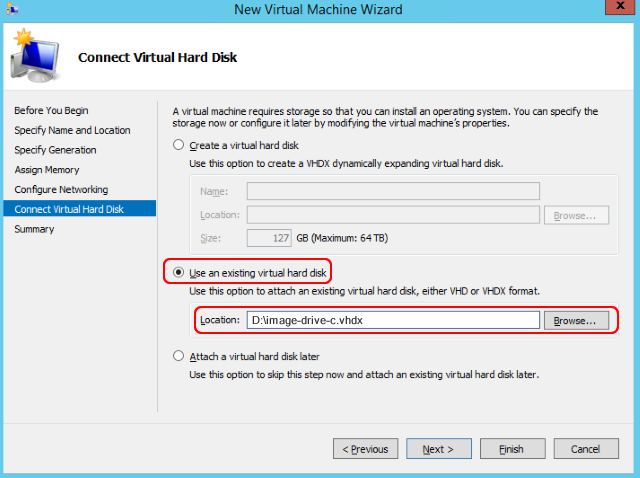
Complete the VM configuration and start it up by right clicking on it and selecting start. The first boot of the machine may take longer since the hardware configuration in the virtualization environment is different from that of the physical machine of origin.
In a few simple steps you have therefore converted a physical machine into a virtual one and you can start Windows without any further intervention.
In addition to Disk2vhd, there are numerous software that allow you to clone a hard disk or perform P2V conversions. One of these is Iperius Backup, which since version 6.0 has introduced a new drive image backup mode, which allows you to clone hard drives and SSDs for both backup and virtualization purposes. Iperius also creates image files in VHD or VHDX format, therefore perfectly compatible with Hyper-V, but also allows you to restore an image backup to another physical spot, by creating a boot disk with the Iperius Recovery Environment®.
For more information, read the tutorial: Drive Image Backup, P2V and Disk Cloning with Iperius
Can this be used to migrate a Linux box to a virtual environment?
Hi,
Unfortunately it’s not possible since Iperius Backup works only on Windows system, so it’s not possible to make drive image of Linux system.
For more technical support please open a ticket on https://support.iperius.net/
Great guide.
Forgot all about the Disk2vhd tool.
One point I’d reinforce is saving the image to a different disk or Network Share than what your cloning (ie not on the C:\).
Another point is that after creating the VM and boots up with a black screen and flashing white cursor. Trying re-creating it as a Gen2 VM instead of Gen1 as described in the main article.
This is mostly due to newer OS’s like Win10 and Secure Boot.
What about Exchange Server? We have dedicated server for Exchange installed directly under under windows server 2012 Standard R2.
Is it possible to convert this solution to Hyper-V. I ask becuase it is generally known, Exchange is too vulnerable for the drastical changes in configuration.
So did you have made test with dedicated Exchange server to convert it to virtual machine?
Thanks
There should be no problem in doing that. With Iperius you can create an exact image of the physical machine disk, obtaining a VHDX file that can be used as a virtual machine into Hyper-V.