Iperius Recovery Environment is the dedicated restore tool of Iperius Backup, downloadable directly from the software and bootable from USB drives or CD-ROM.
In addition to the restore function of Iperius Drive Image backup (described step by step in this tutorial) it’s possible to use this environment for advanced system operations, including the resolution of some problems that can occur after restoring a backup.
In this article, we will see how to fix/repair the Windows bootloader in case of errors when starting the operating system, using simple command line instructions.
Before starting, make sure that you have correctly created Iperius Recovery Environment on your support (USB or CD-ROM), following our appropriate tutorial.
After booting the PC from the USB device (or CD-ROM), start the command prompt by clicking on the highlighted icon (see picture below).
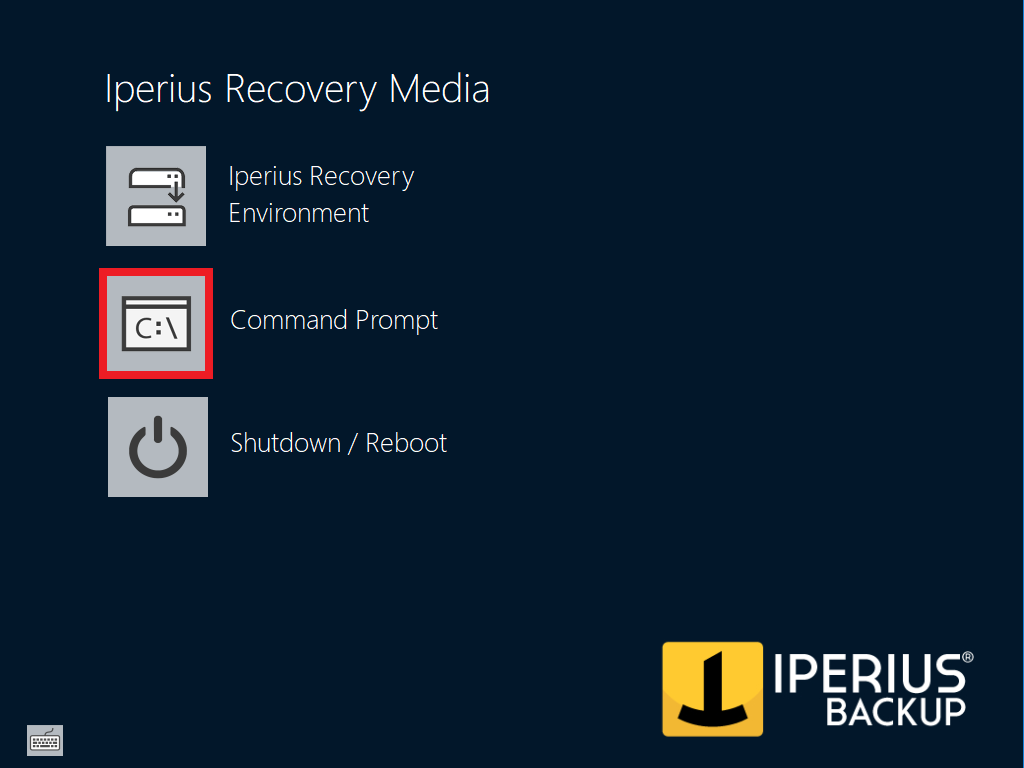
Iperius Recovery Environment – Main Window
The classic Windows command prompt will open. Here you will be able to use the same commands of the default version included inside Windows operating systems.
Now type the command diskpart and press “Enter”. The left side of the console will change, switching from the path where you were previously (in this case X:\windows\system32) to the word “DISKPART“, showing that the command-line utility has been loaded and opened correctly (see picture below).
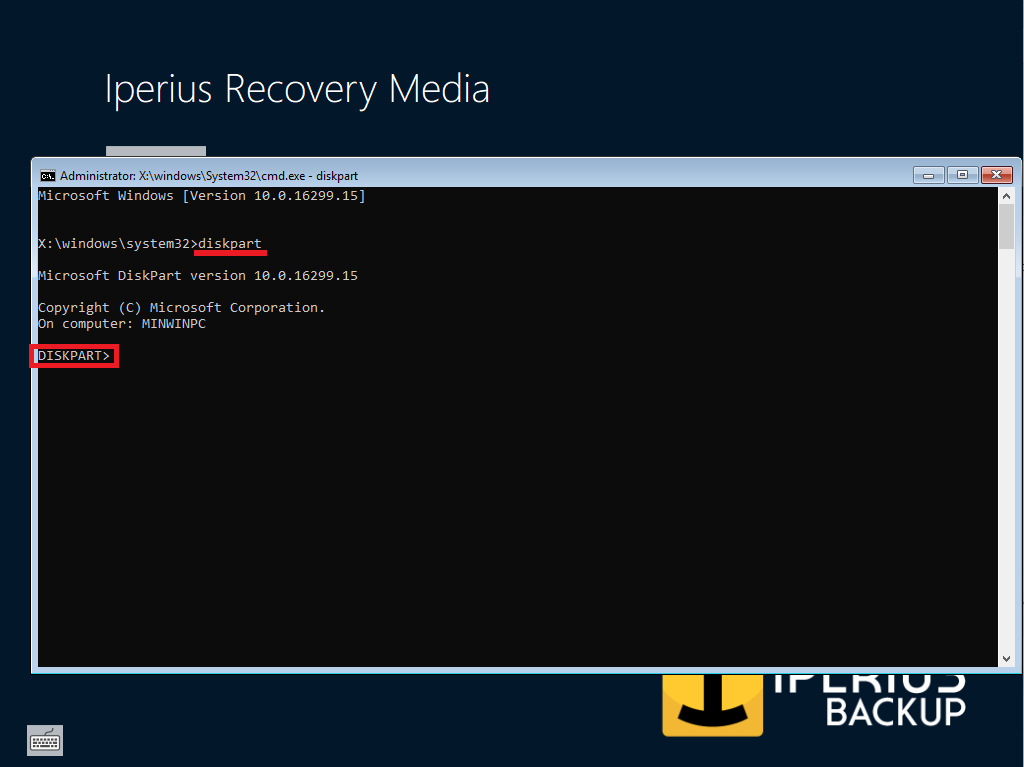
Diskpart – First Run
At this point, use the command list disk to get a list of the disks that are currently connected to the system, along with some basic information such as disk number, size and formatting type (GPT or MBR).
Now you have to identify the disk in which you have restored your image backup previously, using the size and/or index of the disk as a reference.
Once identified, note the disk number and pay attention to the formatting type by checking if there is an asterisk under the GPT column: if present, it means that the disk is formatted in GPT type, otherwise in MBR type.
At this point, this tutorial will split into two parts: continue to section A) if the disk is formatted in GPT or to point B) if formatted in MBR.
A) GPT-based Disk
If your disk is GPT-formatted, the command list disk (executed above) will output a result similar to the image below. Obviously, the result may vary in relation to how many disks are connected to the system.
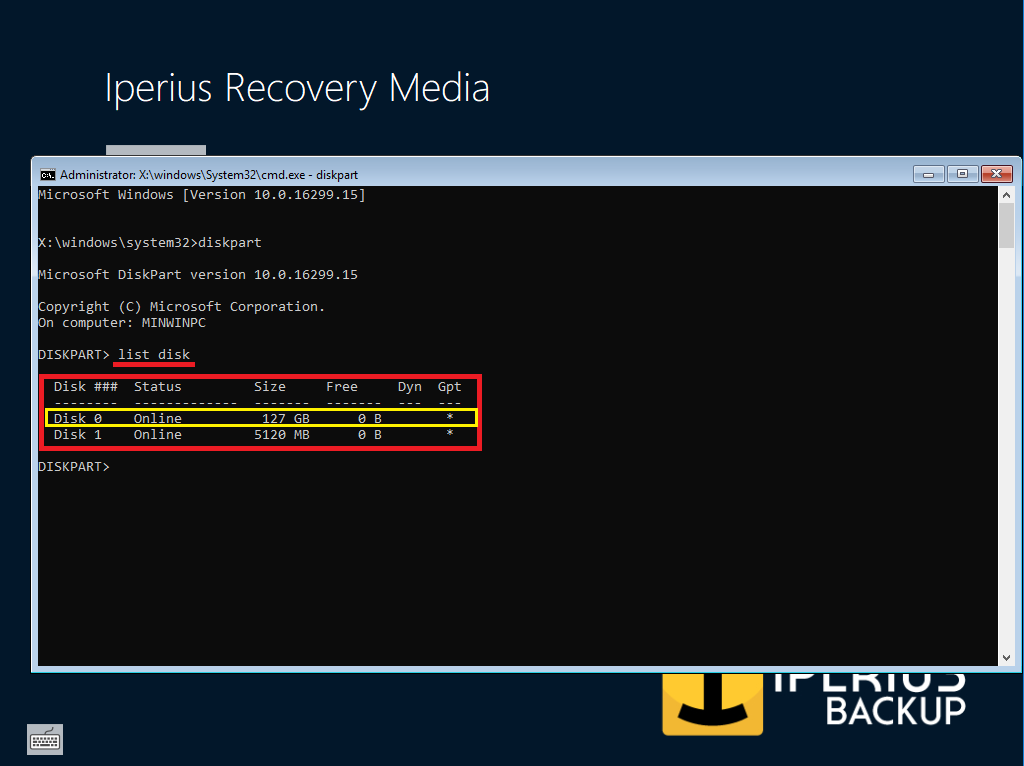
Diskpart – List Disk GPT
Inside the red box you can see the main output of the command, while in the yellow box we highlighted the disk where an Iperius Drive Image backup was performed.
As indicated previously, let’s pay attention to the disk number: we will need it to run the next command-line instruction.
In this case, the disk number is 0 (“zero”).
Now, let’s go on and execute the command select disk X (where X is the disk number we’ve seen previously) to select the disk. Then, run the command list partition .
The command output will be similar to the one shown in the following picture:
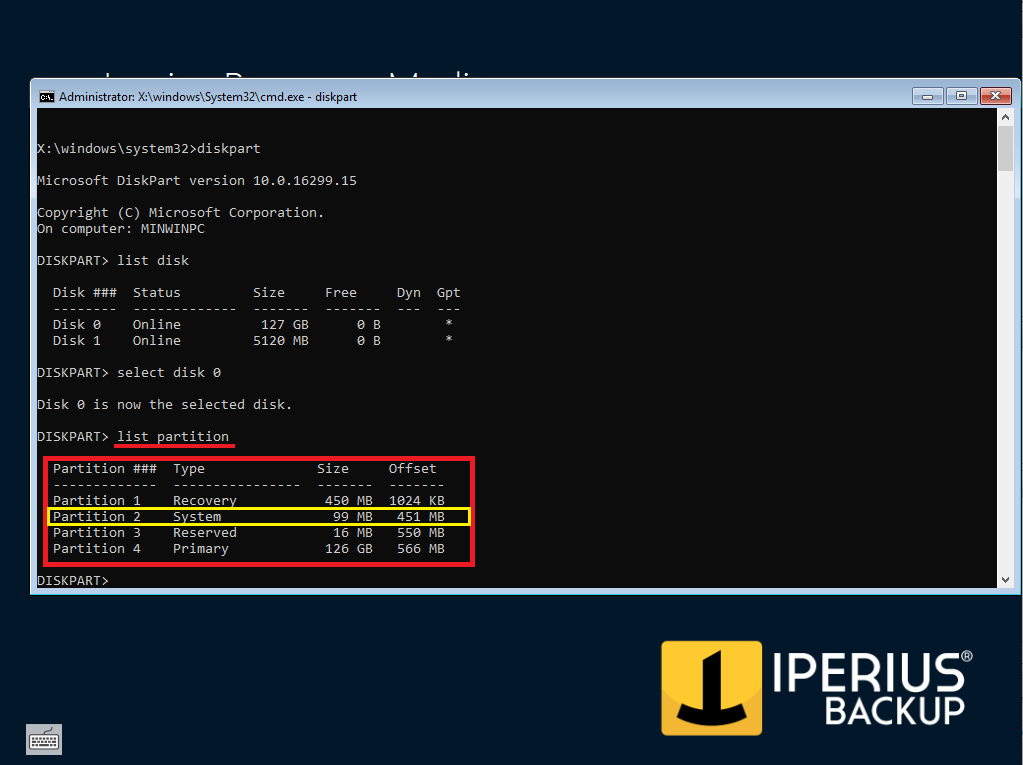
Diskpart – List Partition GPT
In the red box you can see all the partitions on the disk and the related basic information (partition index, type, size, etc.), while in yellow we highlighted the system partition (System), also known as EFI.
The BCD file (Boot Configuration Data) is the file to repair in order to restore the Windows bootloader and it’s stored right inside this volume.
Let’s now select this partition by typing the command select partition Y (where Y is the index of the partition, taken directly from the output of the previous command) and pressing Enter.
In this example, the system partition number is 2, as you can see from the previous image.
At this point, it’s necessary to assign a letter to the partition in order to uniquely identify it when restoring the boot.
To do this, type the command assign letter S and press Enter to proceed. The result should look similar to the following one:
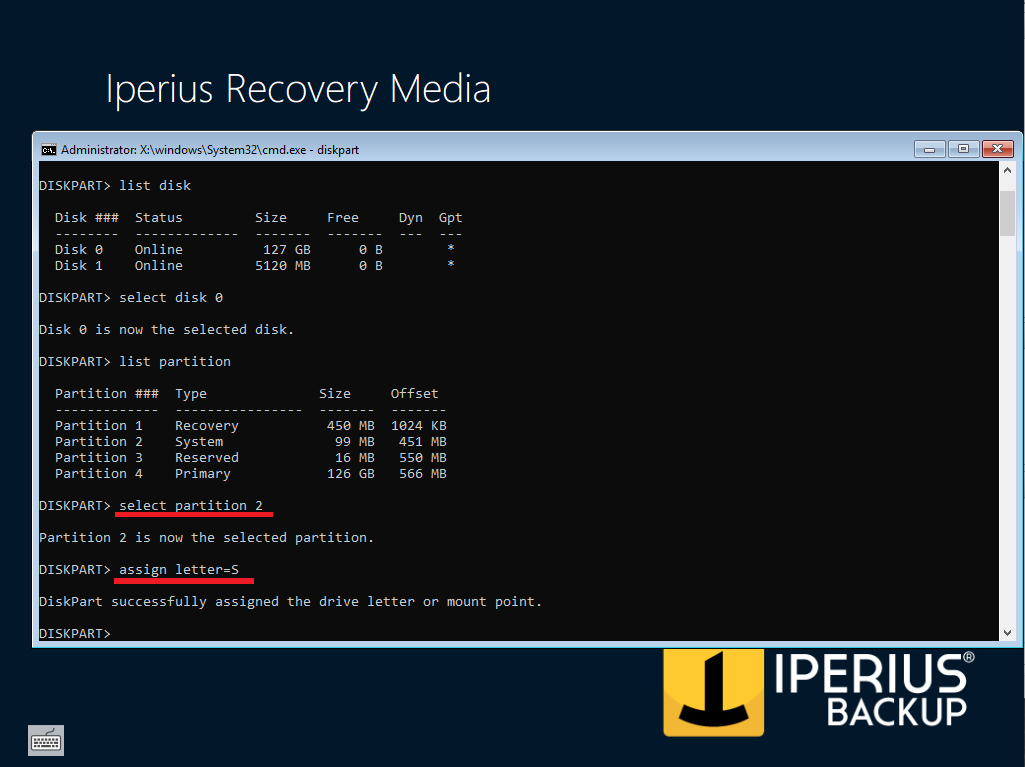
Diskpart – Assign Letter GPT
In this way, you will be able to access the volume related to the system partition using the drive letter S:.
Now let’s go on and identify the volume where Windows is installed.
To do this, let’s run the command detail disk. The instruction will return the list of all the volumes inside the disk (see image below), in addition to a range of basic and advanced information about the disk.
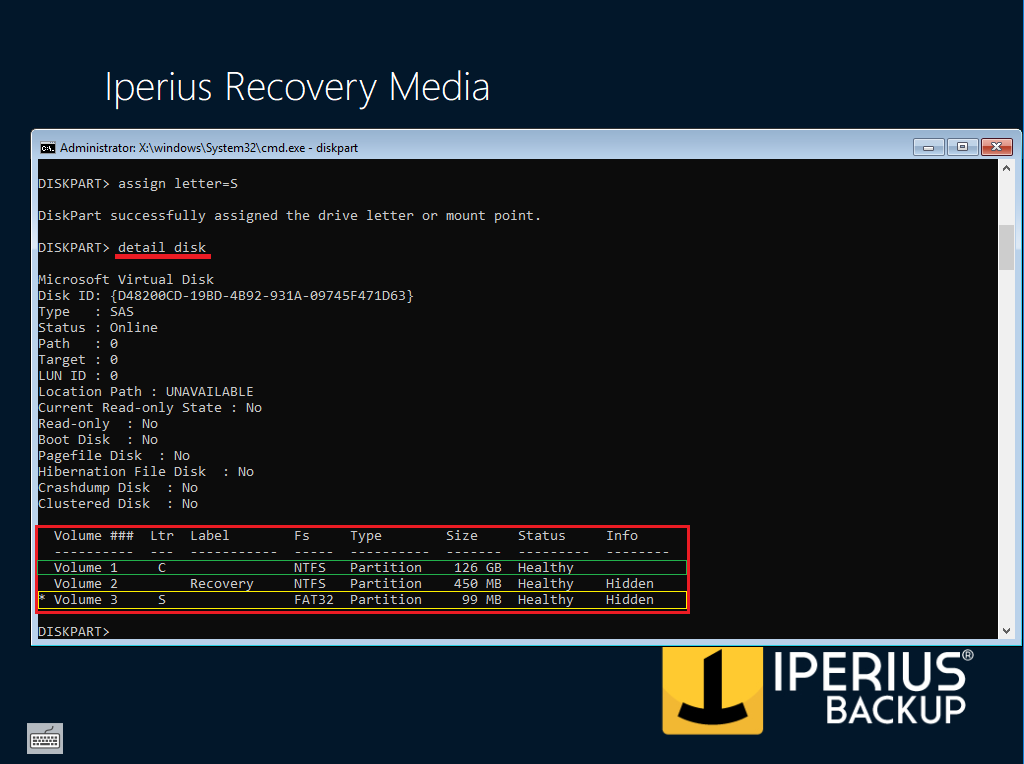
Diskpart – Detail Disk GPT
Inside the red box, you can see the complete output of the command, inside the yellow one the volume related to the system partition is highlighted (with the letter S we assigned previously), while in the green box you can see the volume where Windows is installed.
Once identified the Windows volume (using the size and/or filesystem as references), let’s now pay attention to the “Ltr” column: if there is no drive letter, it will be necessary to assign it manually using the command assign letter that we used earlier.
In this case, the drive letter is present and it’s C:, as shown in the picture above.
At this point, you can quit the Diskpart utility using the command exit.
The left part of the command prompt will go back to the classic view and will show again the system path we started from (X: windows system32).
You can now scroll down to the “Restoring the boot” section to finish the tutorial.
B) MBR-based Disk
If yout disk is MBR-formatted, the list disk command executed above will show you a result similar to the image below. Obviously, the result may vary in relation to how many disks are connected to the system.
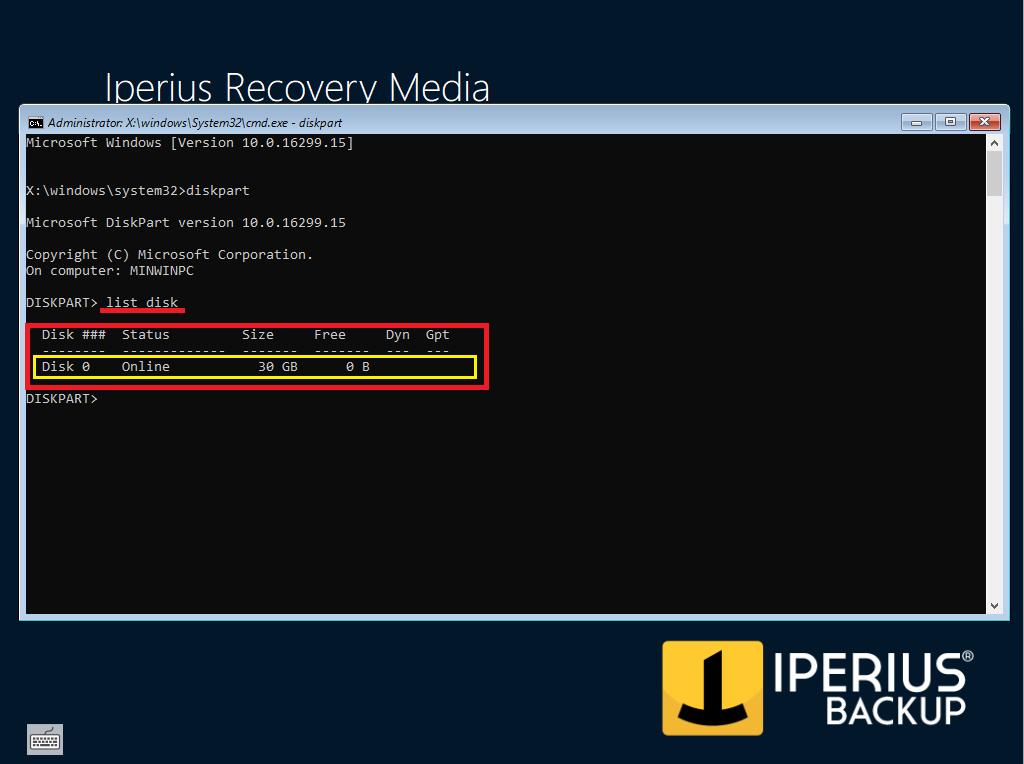
Diskpart – List Disk MBR
Inside the red box you can see the main output of the command, while in the yellow box we highlighted the disk where an Iperius Drive Image backup was performed.
As indicated above, we pay attention to the disk number and write it down: we will need it to run the next command line instruction.
In this case, the disk in question is the number 0 (“zero”).
Now let’s go on and execute the command select disk X (where X is the number you previously noted) to select the disk, followed by the command detail disk.
The command output will be similar to the one shown in the following image:
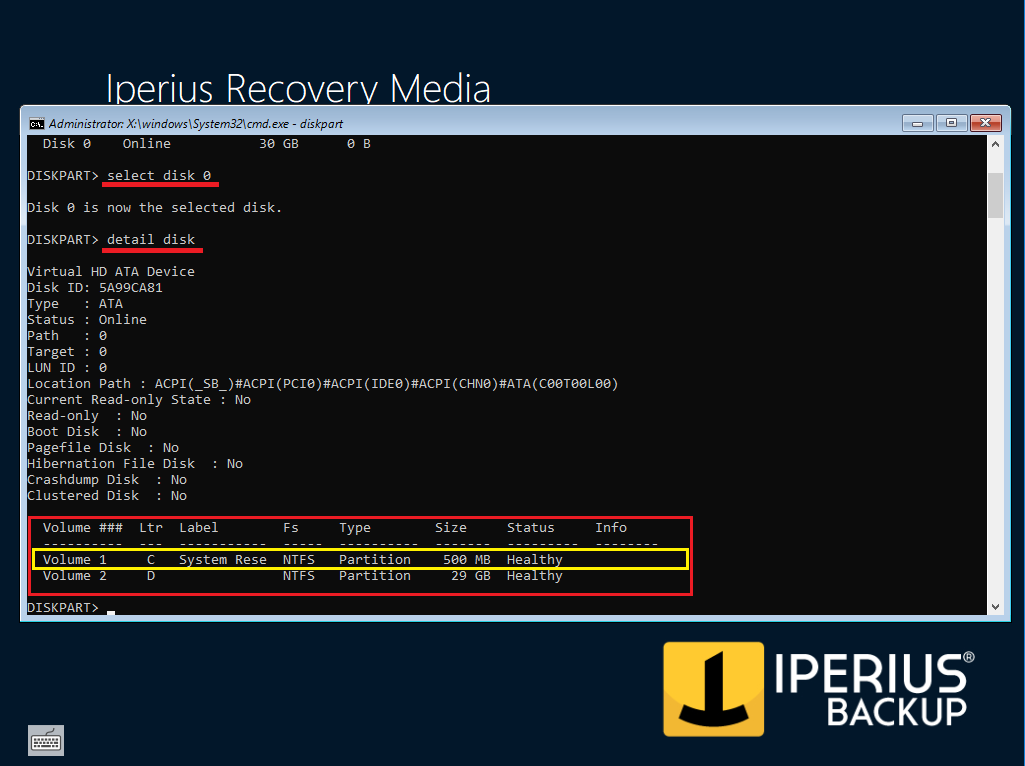
Diskpart – Detail Disk MBR
The instruction will return the list of all the volumes inside the disk (red boxes), in addition to a range of basic and advanced information about the disk.
Among the volumes, highlighted in yellow, you can see the volume related to the system partition (System Reserved).
The BCD file (Boot Configuration Data) is the file to repair in order to restore the Windows boot and it’s stored right inside this volume.
To identify this partition, you can use the volume label: in most of cases, it will be “System Reserved”, as it’s created by default during Windows installation.
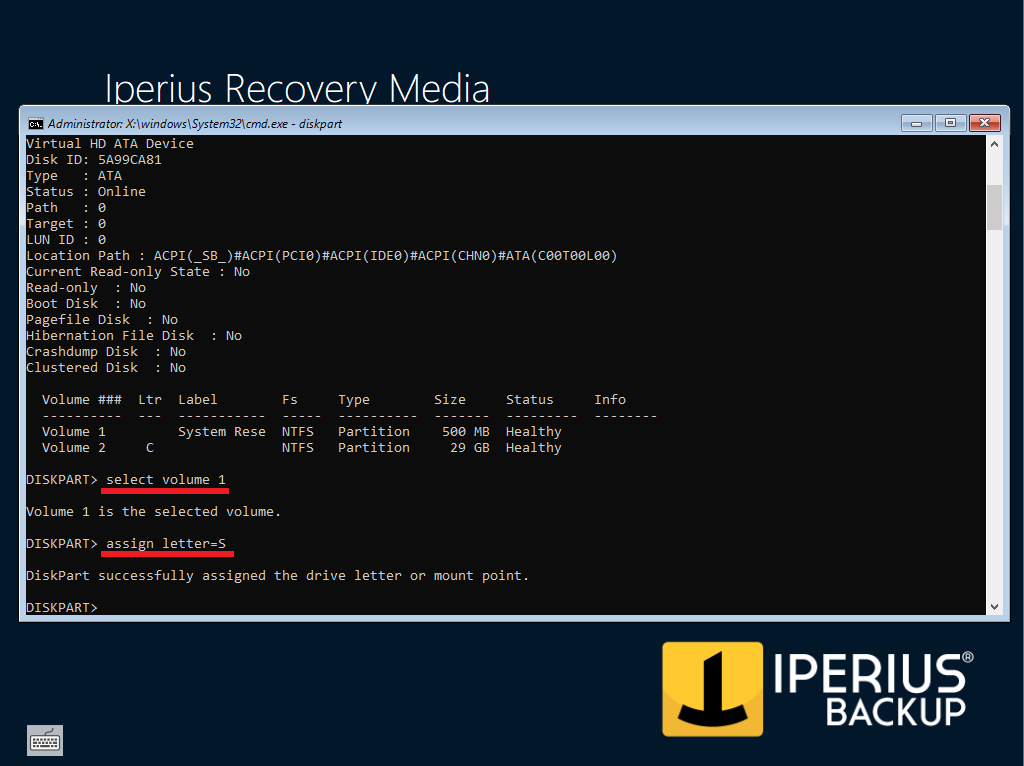
Now, let’s select this volume by typing the command select volume Y (where Y is the index of the volume, taken directly from the output of the previous command) and pressing Enter.
In this example, the system volume number is 1, as you can see from the previous screenshot.
NB: in some Windows environment the system partition may NOT be present. In these cases, please refer to additional note n. 2 (at the end of the tutorial) for further details.
At this point, let’s pay attention to the “Ltr” column corresponding to the system volume. If empty, it will be necessary to assign a drive letter to the partition in order to identify it uniquely when restoring the boot.
To do this, just type the command assign letter=S and press “Enter” to proceed. The result should look similar to the one below:
Diskpart – Assign Letter MBR
In this way, you will be able to access the volume related to the system partition just using the drive letter S:.
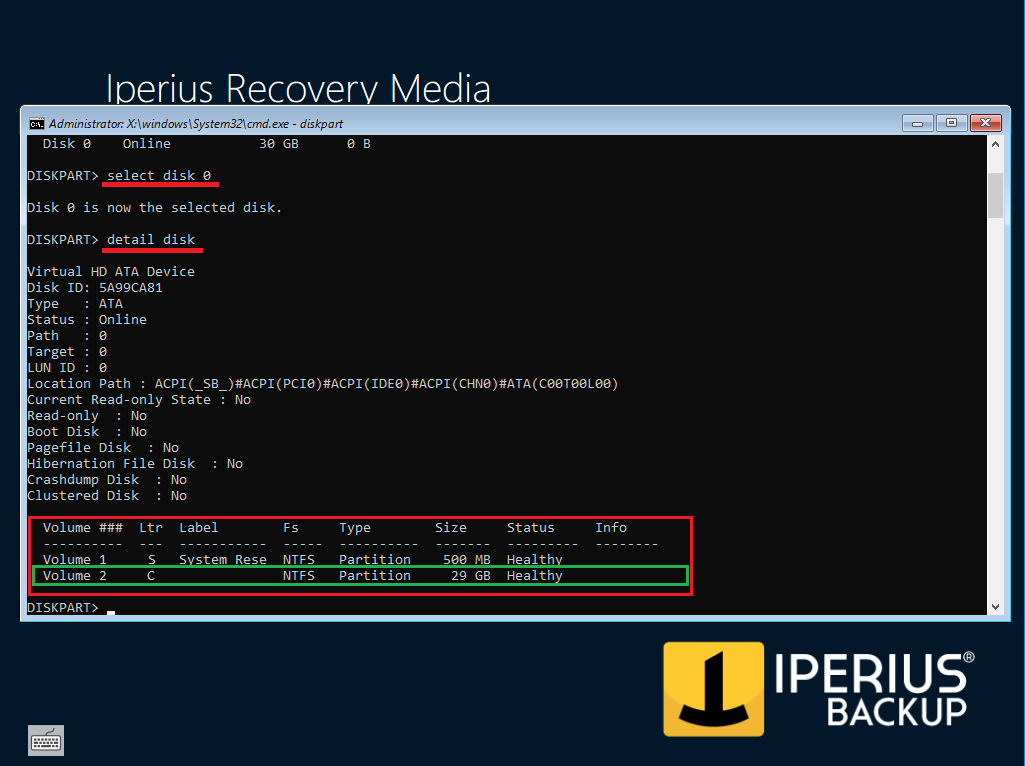
Now let’s go and identify the volume where Windows is installed.
To do this, let’s go back to the list of volumes you previously got from the detail disk command.
Diskpart – Detail disk MBR
Among the volumes in the list, you have to find the one where the operating system is installed, using the label and/or size as a reference.
In the red box, you can see the complete output of the command, while in the green one the Windows volume is highlighted.
Once you find the volume, let’s pay attention again to the “Ltr” column: if there is no drive letter, you have to assign it manually by the assign letter command used earlier.
In this example, the drive letter is present and it’s C:, as shown in the picture above.
Finally, you can quit the Diskpart utility using the exit command.
The left part of the command prompt will go back to the classic view and will show again the system path we started from (X: windows system32).
You can now scroll down to the “Restoring the boot” section to finish the tutorial.
Last phase: Restoring the boot
After following section A) or B) we have arrived at the last phase of this tutorial: boot recovery.
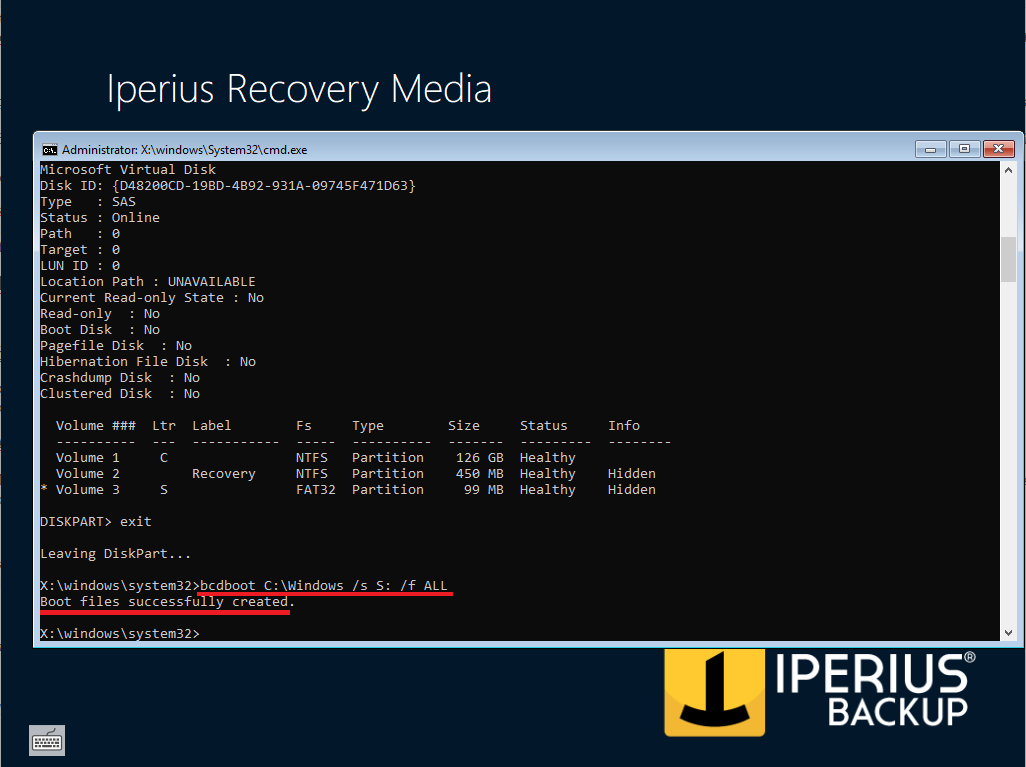
To do this, simply use the following command:
bcdboot C:\Windows /s S: /f ALL
This instruction will copy boot data contained in the C:\Windows folder into the system volume, writing on the BCD file the information that identifies the volume where the operating system is located.
In case of success, the command output will be similar to the one shown in the following picture:
Boot recovery – bcdboot
At the next reboot, the operating system will restart without any problems. Relevant hardware changes, errors in the management of the partitions, deletion of system files: these are just some of the possible causes of boot failures.
With this tutorial, you have seen how to restore Windows systems boot in a simple and fast way, following just few steps and without the risk of losing your data.
Additional notes
¹ In this example we used the letter S assuming that it was not already assigned to another unit. In case it’s already in use, the utility will return the following error:
Diskpart – Assign Letter error
To continue, simply repeat the command using a letter free from any assignments.
² In a MBR-type disk system it can happen that the system partition is not present. However, it’s possible to restore the boot simply indicating the Windows partition as an active system partition.
To do this, just follow the steps above to assign a drive letter to the Windows partition, if there isn’t one already assigned (and obviously skipping the whole part about the system partition).
Before leaving diskpart, type the command active and press Enter (the affected partition will be the Windows one, as it was already selected previously). In this way the volume will be recognized as the boot/system partition.
After that, just leave diskpart and use the following command to restore the boot (in our example, the letter C: has been assigned to the Windows partition)
bcdboot C:\Windows /s C: /f ALL
Compared to the generic command, you can see how the Windows partition is used as a system partition (as the C: drive letter follows the /s attribute).
PLEASE NOTE: if you need technical support or have any sales or technical question, don't use comments. Instead open a TICKET here: https://www.iperiusbackup.com/contact.aspx
**********************************************************************************
PLEASE NOTE: if you need technical support or have any sales or technical question, don't use comments. Instead open a TICKET here: https://www.iperiusbackup.com/contact.aspx
*****************************************